


28 AutoView 424 Installer/User Guide
To assign the extended access user peripheral type:
1. Press the Control key twice to access the Command menu.
2. Highlight Administrator Functions - Remote User.
3. Press the Space key to toggle between either PS/2 or Sun peripherals and
press Enter.
To assign the power state selection:
1. Press the Control key twice to access the Command menu.
2. Highlight Administrator Functions - Switch To.
3. Press the Space key to toggle between either Powered Channels or All
Channels to set the type of system the AutoView 400 will switch to. If
Switch To is toggled to All Channels, the AutoView 400 will switch to a
connected system regardless of power state. By default, the AutoView will
only switch to systems that are powered up.
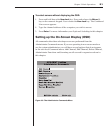
To enable the setup port:
1. Press the Control key twice to access the Command menu.
2. Highlight Administrator Functions - Setup Port.
3. Press the Space key to toggle between either For OSD Utility or Disabled.
If you enable the setup port, you can automatically program the OSD via
the OSD Confi guration Utility or perform FLASH upgrades. Depending
on the application, you may be asked to enable the setup port in the
instructions that come with your AutoView enhancement.
Performing FLASH upgrades
FLASH upgrading allows you to update the code that runs your AutoView 424
and keep it current with the latest firmware revisions. For more information,
see Appendix A.
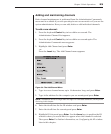
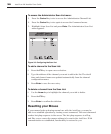
Scanning your AutoView System
The AutoView 424 scanning feature allows you to automatically monitor, or
scan, your computer channels without intervention. When keyboard activity is
detected, scanning is suspended until all keyboard activity stops. Scanning then
resumes with the next channel in sequence. The length of time each channel
remains on the screen, or dwell time, is configurable and can be changed at
any time.