Installation adjustment mode
8-2 5976284 BARCOGRAPHICS 808s 150501
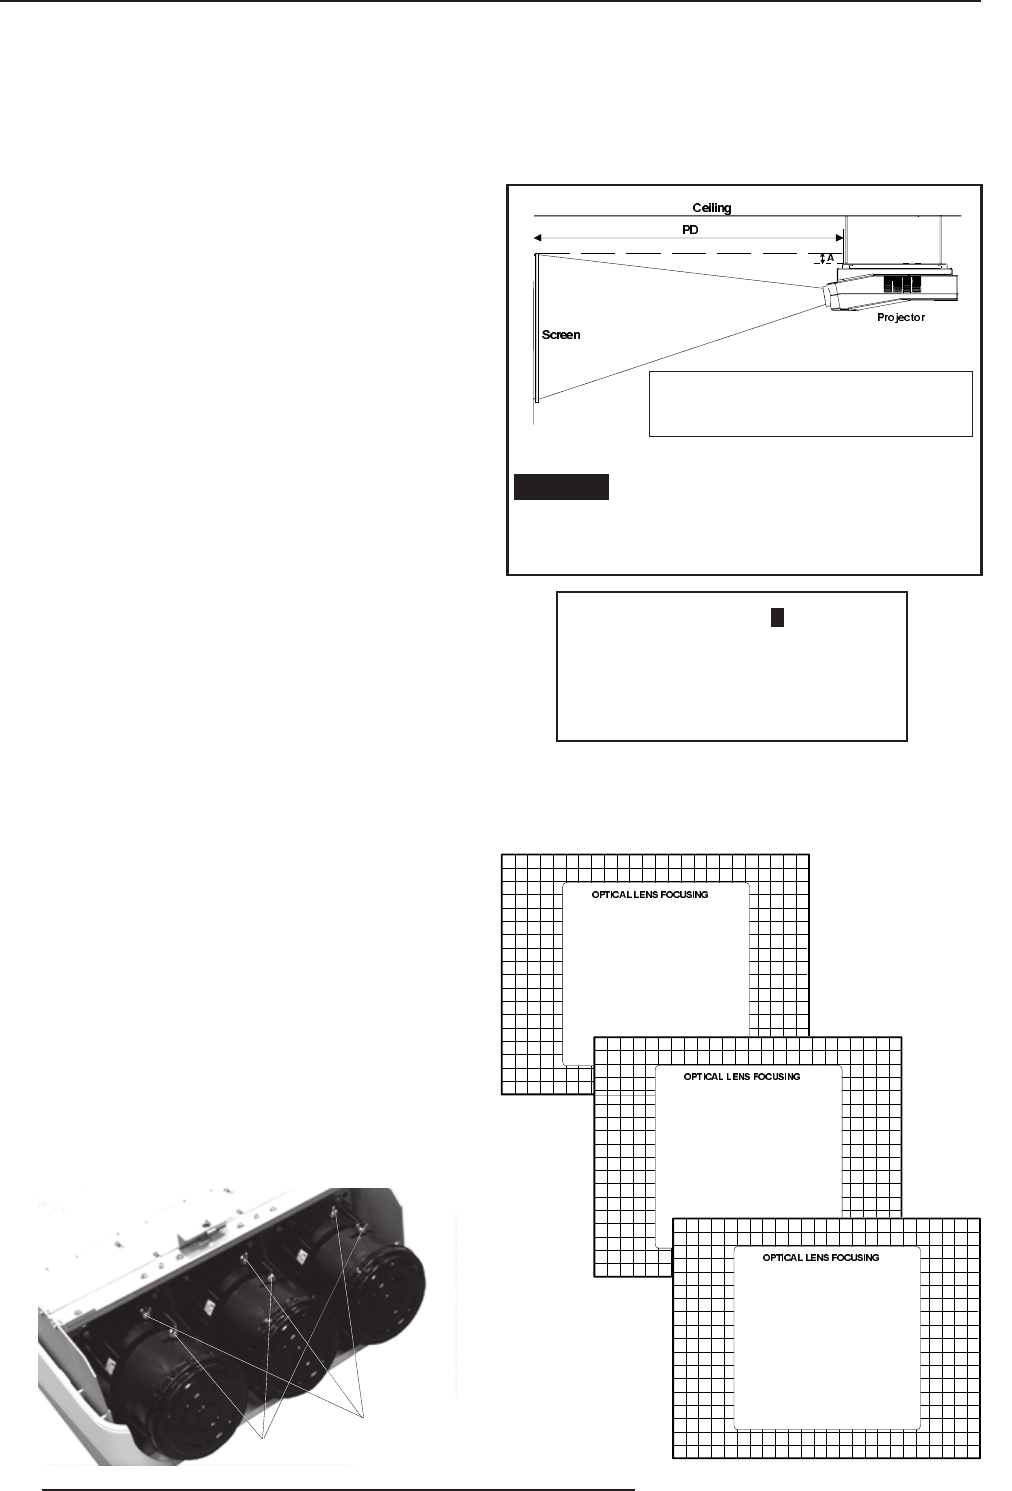
Optical Lens Focusing
The optical focusing procedure is performed separately for each lens.
The appropriate CRT will be switched on as the user proceeds
through the optical focusing adjustment sequence.
Each lens has two focus adjustment points, one at the rear of the lens
and one at the front. The center of the projected image is focused by
loosening the wing nut at the rear end of the lens and rotating the lens
barrel until the center of the image is clearly focused. The corners of
the projected image are focused by loosening the wing nut at the front
end of the lens and rotating the lens barrel until the corners of the
image are clearly focused. Repetition of these adjustments may be
necessary to optimize optical focusing.
Press the <ENTER> key to continue. After finishing focusing of the
three lenses, press the <ENTER> key to enter the Raster centering.
Press the <EXIT> key to return to operational mode.
Press the <ADJUST> key to return to operational mode.
Important : Access to adjustments
The top cover of the projector should be removed in order to gain
access to the adjustments.
Please refer to p.4-1 for how to remove the top cover.
Projector Distance
On the screen, a drawing will be displayed together with parameters
indicating a correct installation position.
To change the screen width :
Push the control stick to the left or to the right to highlight the item
SW in the "Projector Distance 1" menu and then press the
<TEXT> key.
If the <ENTER> key is pressed, the "Optical Lens Focusing" will be
displayed.
If the <EXIT> key is pressed, the projector will return to the
previous menu.
After the <TEXT> key is pressed, the next menu "Projector
Distance 2" will be displayed on the screen. It allows the user to
change the Screen width.
Push the control stick to the left or to the right to highlight the digit
needed to be changed, and enter the desired digit with the numeric
keys on the RCU or the local keypad.
Press the <ENTER> key to confirm the changes. The projector will
redisplay the "Projector Distance 1" menu with updated values for
the three parameters.
Press the <ENTER> key to continue with the "Optical Lens
Focusing".
If the <EXIT> key is pressed, the projector will return to the
previous menu.
The same applies to the PD (projector distance). You can use the
above-mentioned procedure to obtain a correct updated value of SW
(screenwidth) after entering a new value of PD (projector distance).
A = Correction value
PD= Perpendicular distance between screen and projector
SW= Screen width
SCREENWIDTH = 2 , 6 0 m
Select with arrow keys; reprogram with numeric keys and
then <ENTER> to confirm.
Maximum screenwidth = 6 m
Maximum proj. distance = 8,1 m.
SW = 2.6 m PD= 3.64m A=12 cm
Select with arrow keys; <TEXT> to reprogram
<ENTER> to continue; <EXIT> to return.
WARNING: ONLY FOR STANDARD PROJECTORS !!
Corner focusing
Center focusing
<ENTER> to continue
<EXIT> to return
1. LOOSEN THE NUT ON THE
REAR OF THE GREEN LENS,
ROTATE THE LENS BARREL
TO FOCUS THE CENTER
OF THE IMAGE,
THEN TIGHTEN THE NUT
2. LOOSEN THE NUT ON THE
FRONT OF THE GREEN LENS
AND ROTATE THE FRONT
SECTION OF THE LENS TO
FOCUS THE CORNERS OF THE
IMAGE, THEN TIGHTEN THE NUT.
<ENTER> to continue
<EXIT> to return
1. LOOSEN THE NUT ON THE
REAR OF THE RED LENS,
ROTATE THE LENS BARREL
TO FOCUS THE CENTER
OF THE IMAGE,
THEN TIGHTEN THE NUT
2. LOOSEN THE NUT ON THE
FRONT OF THE RED LENS
AND ROTATE THE FRONT
SECTION OF THE LENS TO
FOCUS THE CORNERS OF THE
IMAGE, THEN TIGHTEN THE NUT.
<ENTER> to continue
<EXIT> to return
1. LOOSEN THE NUT ON THE
REAR OF THE BLUE LENS,
ROTATE THE LENS BARREL
TO FOCUS THE CENTER
OF THE IMAGE,
THEN TIGHTEN THE NUT
2. LOOSEN THE NUT ON THE
FRONT OF THE BLUE LENS
AND ROTATE THE FRONT
SECTION OF THE LENS TO
FOCUS THE CORNERS OF THE
IMAGE, THEN TIGHTEN THE NUT.


