


1-14 (No.PA019)
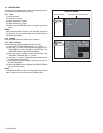
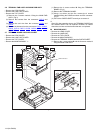
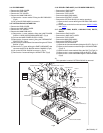
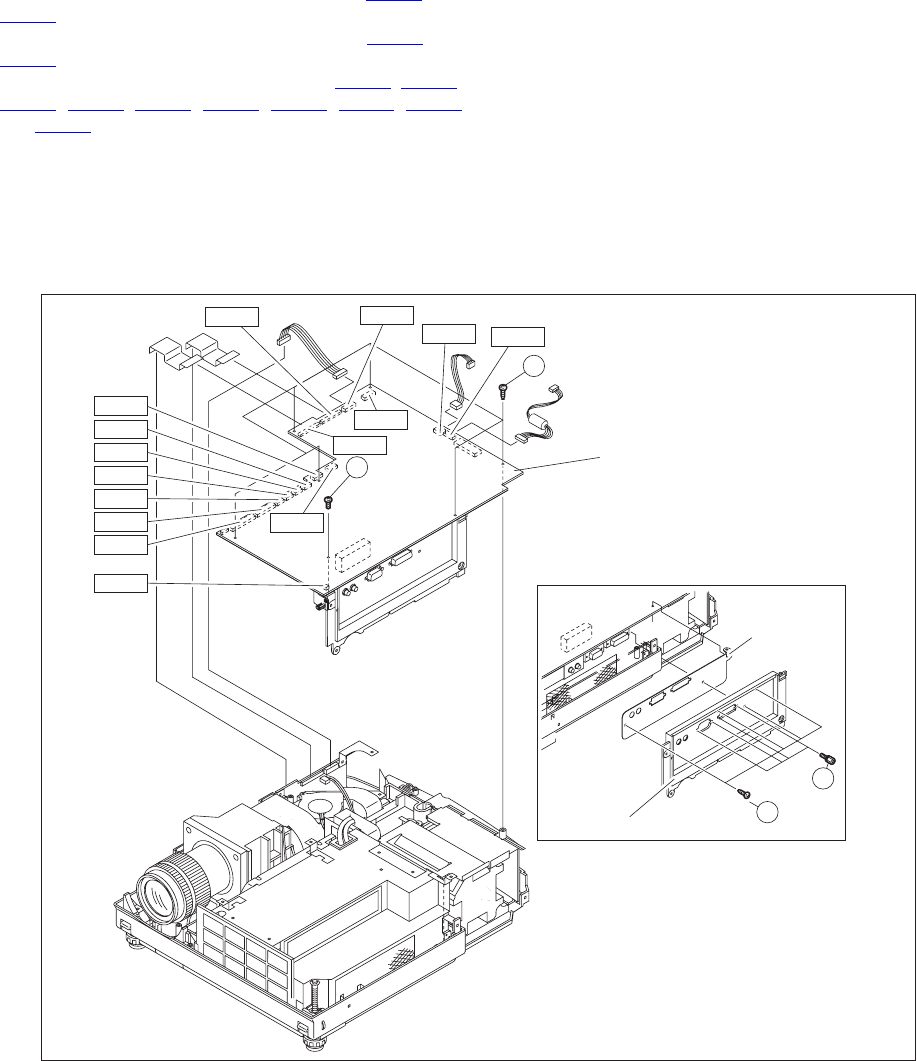
3.6 TERMINAL PWB ASS'Y AND MAIN PWB ASS'Y
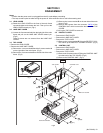
• Remove the LENS COVER.
• Remove the LAMP UNIT COVER.
• Remove the TOP COVER.
(1) Remove the 6 screws marked J fixing the MAIN PWB
ASS'Y. (Fig.3)
(2) Remove the harness from the connectors CN710
and
CN711
.
(3) Remove the cord wire from the connector CN504 and
CN505
.
(4) Remove the harness from the connectors CN501
, CN502,
CN503, CN714, CN707, CN706, CN705, CN713, CN704
and CN708.
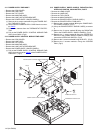
3.7 TERMINAL BOARD AND SHIELD SHEET
• Remove the LENS COVER.
• Remove the LAMP UNIT COVER.
• Remove the TOP COVER.
• Remove the MAIN PWB ASS'Y. *1
(1) Remove the 4 screws marked G fixing the TERMINAL
BOARD. (Fig.3)
(2) Remove the TERMINAL BOARD.
(3) Using a nut driver and the like, remove the 4 screws
marked H fixing the D-SUB connector and DVI connector.
(Fig.3)
(4) Pull out the SHIELD SHEET toward you to remove it.
*1
After (2) in the procedure above, the TERMINAL BOARD and
the SHIELD SHEET can be replaced. However, be careful
about the cord wire and the harness that are not replaced.
3.8 MAIN PWB ASS'Y
• Remove the LENS COVER.
• Remove the LAMP UNIT.
• Remove the TOP COVER.
• Remove the MAIN PWB ASS'Y.
• Remove the TERMINAL BOARD and the SHIELD SHEET.
(1) Remove the 1 screw market K and the 6 screws marked J
fixing the MAIN PWB ASS'Y.
Fig.3
SHIELD SHEET
MAIN PWB ASS'Y
J
(x1)
(x6)
CN708
CN704
CN713
CN705
CN706
CN707
CN714
CN701
CN505
CN504
CN503
CN501
CN502
CN710
CN711
K
TERMINAL BOARD
(x4)
(x4)
H
G