


1
2
3
4
5
6
section
58
4-5 Device Settings Menu Options
Certificate
Certificate Settings
The RIPM uses the Secure Socket Layer (SSL) protocol for any encrypted
network traffic between itself and a connected client. During the connection
establishment, the RIPM must expose its identity to a client using a
cryptographic certificate. Upon delivery, this certificate and the underlying
secret key will be the same for all RIPMs ever produced and will not match
the network configuration that will be applied to the RIPM by its user. The
certificate’s underlying secret key is also used for securing the SSL handshake.
It is possible to generate and install a new base64 x.509 certificate that is unique
for a particular RIPM. In order to do that, the RIPM is able to generate a new
cryptographic key and the associated Certificate Signing Request (CSR) that
needs to be certified by a certification authority (CA). A CA verifies that you are
who you claim to be and signs and issues to you an SSL certificate. To create
and install an SSL certificate for the RIPM, do the following:
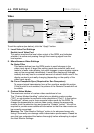
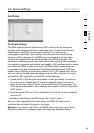
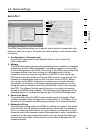
• Create an SSL CSR using the panel shown in the figure below. You need to
fill out a number of fields, each of which is explained below. Once this is
done, click on the “Create” button; this will initiate the CSR generation. The
CSR can be downloaded to your administration machine with the “Download
CSR” button.
• Send the saved CSR to a CA for certification. You will get the new certificate
from the CA.
• Upload the certificate to the RIPM using the “Create” button.
After you have completed these three steps, the RIPM will have its own
certificate that will identify the card to its clients.
Warning: If you destroy the CSR on the RIPM, there is no way to get it back.
Should you delete it by mistake, repeat the three steps described above.