


Connection 23
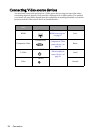
Connecting a computer or monitor
Connecting a computer
The projector can connect to both IBM® compatibles and Macintosh® computers. A Mac
adapter is needed if you are connecting legacy version Macintosh computers.
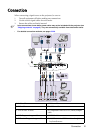
To connect the projector to a notebook or desktop computer (using VGA):
1. Take the supplied VGA cable and connect one end to the D-Sub output socket of the
computer.
2. Connect the other end of the VGA cable to the COMPUTER 1 or COMPUTER 2
signal input jack on the projector.
3. If you wish to make use of the projector speaker(s) in your presentations, take a
suitable audio cable and connect one end of the cable to the audio output jack of the
computer, and the other end to the AUDIO jack of the projector. When you connect
audio output signal from a computer, please balance out the volume control bar to
obtain an optimal sound effects.
4. If you wish, you can use another suitable audio cable and connect one end of the cable
to the AUDIO OUT jack of the projector, and the other end to your external speakers
(not supplied).
Once connected, the audio can be controlled by the projector On-Screen Display
(OSD) menus. See "Audio Settings" on page 73 for details.
The built-in speaker will be muted when the AUDIO OUT jack is connected.
To connect the projector to a notebook or desktop computer (using USB):
1. Take a USB mini-B type to USB A type cable and connect one end to the A type jack of
the computer.
2. Connect the other end of the cable to the MINI-B jack on the projector.
• It may take several seconds to successfully display the screen for the first time plug-in.
• If computer's screen still can't be projected, please go to "My Computer", find the
projector name (same as using a flash disk drive), then double click it.
• Projection speed will vary according to the computer capability.
To connect the projector to a notebook or desktop computer (using LAN):
1. Take a RJ45 cable and connect one end to the LAN input jack of the projector and the
other end to the RJ45 port.
2. Make sure that your computer is also connected to an internet cable. Please use Q
Presenter program to connect network display and transfers the desktop contents of
the host PC via local network connection. See "Displaying image through Q Presenter"
on page 57 for details.
Do not use the RJ45 cable to connect the projector to your computer. Because this connection
needs an IP router.
To connect the projector to a notebook or desktop computer (using HDMI):
1. Take a HDMI cable and connect one end to the HDMI jack of the computer.
2. Connect the other end of the cable to the HDMI jack on the projector.
• Many notebooks do not turn on their external video ports when connected to a projector.
Usually a key combo like FN + F3 or CRT/LCD key turns the external display on/off. Locate