


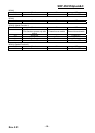

Rev. 2.01
- 7 -
SRP-350/352plusA&C
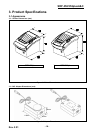
2. Installation and Operation
2-1 Installation
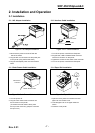
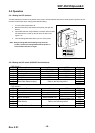
2-1-1 AC Adapter Installation
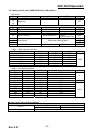
2-1-2 Interface Cable Installation
Figure 2-1 AC Adapter Installation
1. Mack sure the printer is turned off with the
side of the switch.
2. Plug the DC cord connector into the power jack
on the printer. (Plug the flat side down)
3. Plug the AC Adapter power cord into the wall
outlet.
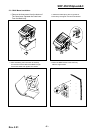
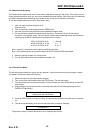
2-1-3 Cash Drawer Cable Installation
Figure 2-2 I/F Cable Installation
1. Turn off the printer, host ECR and Computer.
2. Plug RS-232, USB or Parallel Cable connector
into the I/F connector on the printer.
3. Tighten the screws on both sides of the connector.
4. Turn on the printer, host ECR and Computer.
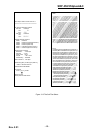
2-1-4 Paper Roll Installation
Figure 2-3 Cash Drawer Cable Installation
1. Turn the printer off.
2. Plug the cash drawer cable connector into
the connector on the printer.
(To remove the cash drawer cable, press
the clip on the connector, grasp the connector
and pull it out.)
Figure 2-4 Paper Roll Installation
1. Open the cover printer and remove the used
paper roll core if there is one.
2. Load the paper roll on the paper holder as
shown.
3. Close the cover printer.
Cash Drawer
Connector
Cash Drawer Cable
Interface Cable
Interface Connector