


Chapter 4: Configuration
724-746-5500 | blackbox.com
Page 27
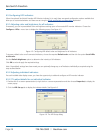
4.4.2 Configuring multiple monitors
Multi-Monitor configuration is similar to normal Glide and Switch setup except that you can add more than one display per PC, up
to a total of eight per machine.
Note: It is necessary to install a driver on each PC that has multiple displays - see 4.4.1 Installing drivers and multi-monitor config
app opposite.
1. Use the supplied flash upgrade cable to link the computer serial port to the ServSwitch Freedom OPTIONS port. If the optional
ServSwitch Freedom LED Monitor module is connected to the OPTIONS port, then instead connect the upgrade cable between
the computer serial port and the TO KEYPAD OR PC port of the ServSwitch Freedom LED Monitor module (see 3.3.5 Optional
LED indicator connections for details).
2. If it is not already running, start the Glide and Switch configuration application.
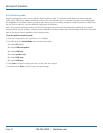
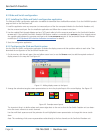
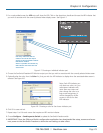
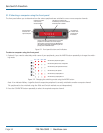
3. On the icon bar, click the red, green, blue and yellow screen icons (or use the Screens menu) to add the required number of
display screens per computer to the map area.
For example, to add two monitors for PC 1, click the red computer icon twice. The two red monitor representations will be
placed side by side within the Glide and Switch map area. See Figure 4-4.
Figure 4-4. Adding new screens
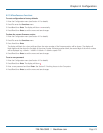
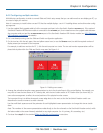
4. Arrange the colored rectangular screen representations to mimic the physical layout of the actual displays. For example, you
may wish to have the two screens of PC1 side by side, with the two screen screens of PC2 below them (as shown left), or
some other arrangement to reflect the actual positions of the physical monitor screens.
The important thing is to define where each screen edge abuts to the next so that the ServSwitch Freedom switch can
determine the correct moments to switch channels.
Use the small black squares around the perimeter of each highlighted screen representation to change their size or stretch
them.
Note: The numbers of the screen representations relate directly to the four channels on the ServSwitch Freedom switch, while
the letters relate to the screen hierarchy attached to any single computer (i.e. A is primary, B is secondary, etc.).
5. Continue from step 3 of the standard Glide and Switch configuration instructions.