


ASYNC ROUTER AR-P, AR-5, AND SYNC ROUTER USER’S MANUAL
32
6. Setaddr next prompts you for the frame type, used on the Ethernet to be connected to the Router.
For Frame Type 802.3 enter 1
For Frame Type Ethernet_II enter 2
For Frame Type 802.2 enter 3
For Frame Type SNAP enter 9
What is the Frame Type you are using ?
Enter the number designated for the desired frame type, and press the RETURN key.
7. Setaddr prompts you for the desired name of the Router.
A unique name is a name that is not used by any
NetWare file servers, print servers or Routers.
Enter a unique name for the Router:
Enter the desired name of the Router, and press the RETURN key.
8. Now exit the Stacker utility and unmount the a: drive:
Initial configuration for your Router is now complete. You
must now take the boot disk, insert it into your Router
and power on the unit. After the Router boots, you can
complete the configuration of the Router by using Telnet
(IP) or RouterVu (IPX) to access the box.
STACKER doubles your disk capacity!!
(type ‘EXIT’ to unmount drive a:)
Enter
exit <RETURN>
9. Remove the Router boot diskette from the PC’s diskette drive.
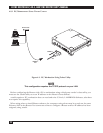
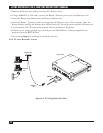
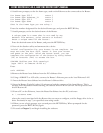
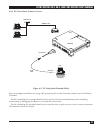
10. Using a 10BASE-T or AUI cable, connect the Router’s Ethernet port to the local Ethernet LAN.
11. Insert the Router boot diskette into the Router’s diskette drive.
12. Start the Router. Typically it takes 2-3 minutes to load the contents of the boot diskette. This is
normal. After the Router finishes starting, the diskette drive LED will turn off. Do not proceed until
this LED turns off.
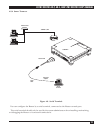
13. From a PC on the Ethernet, insert the RouterVu diskette into the PC, and enter:
a: \ routervu name
where the name is associated with the Router that you want to configure, and the floppy drive is the a:
drive. Previously in step 7, you specified name using setaddr.
14. When you see a login prompt, type root and press the RETURN key. When prompted for the
password, press the RETURN key again.
15. Proceed to Chapter 5, and begin installing the software.