


11
PAGE HEADER.....OPERATING YOUR BREVILLE PERSONAL PIE™
2. Allow the Pie Maker to preheat with
the lid closed. When the green ‘Ready’
light illuminates, the Pie Maker
is ready to use, approximately 4-5
minutes. The 'Ready' light will cycle on
and off during operation to maintain
the correct temperature.
NOTE
When baking the first batch of pies,
it is recommended to allow the Pie
Maker to preheat for two cycles
to achieve the optimum baking
temperature. To preheat the Pie Maker
for two cycles, allow the green ‘Ready’
light to illuminate then go out, then
illuminate again. The Pie Maker is
ready to use when the green ‘Ready’
light illuminates for the second time.
3. While the Pie Maker is preheating,
lightly flour the work surface, roll out
the thawed pastry sheet, then sprinkle
generously with flour. This will prevent
the pastry from sticking to the Pastry
Cutter and Pastry Press.
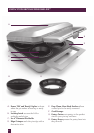
4. Position the Pastry Cutter over the flat
sheet of pastry. Press down firmly. Do
not twist as this will tear the pastry. Cut
4 pastry tops (using the smaller end)
and 4 pastry bases (using the larger
end). One standard ready-rolled square
sheet or ready-rolled round is sufficient
for two pies (2 pastry tops and 2 pastry
bases), so you will need 2 sheets. Ensure
the cut is smooth around the edges.
TIP
The edge of the Pastry Cutter can be
sharp when applying pressure. For
more comfortable pastry cutting, nest
the Pastry Press inside the Pastry
Cutter and push down with the palm
of your hand.
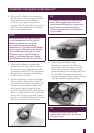
5. When the green 'Ready' light
illuminates, open the lid. Place one
pastry base over the center of one Pie
Mold. Using the Pastry Press, gently
press downwards to mold the pastry into
the Pie Mold. The edge of the pastry
should overlap the Edge Crimper. Repeat
with the remaining 3 pastry bases.
TIP
If the Pastry Press sticks to the
pastry base, lightly flour the pastry
or Pastry Press.