


GT-3 Series
7. Troubleshooting
106
7-2-1. Procedure for Solving the Print Quality Problems
Follow the procedure (Step 1 to 7) below until the print quality problem is solved.
<Note>
The following steps are shown with CMYK Print Heads and do the same in case of White Print Heads.
Step 1: Confirm the amount of remaining Ink in the Ink Cartridge and execute Normal Cleaning.
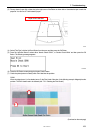
Head Cleaning, with flushing fresh ink, can solve most of print quality problems. Check the nozzles by test printing of Nozzle
Check Pattern (see "7-2-3. Checking Print Quality with Nozzle Check Pattern ") first and execute Normal Cleaning to the Print
Head concerned (see “7-2-2. Cleaning the Print Heads / Using the Head Cleaning Button”) Repeat the Normal Cleaning a
few times. and check again by printing Nozzle Check Pattern. If the problem is not solved, go on to the next step.
<Note>
z It is very important the machine is used in an environment as specified. Use a humidifier to keep the humidity up to 35% to
keep print quality.
z Your printer automatically cleans its Print Heads every 24 prints; however more frequent Print Heads cleaning may need
to be done depending on the environment. In this case, change the Auto Head Cleaning frequency (see “7-2-5. Changing
the Auto Cleaning Setting”).
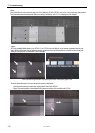
Step 2: Replace Wiper Cleaners and clean around the Print Heads.
The Wiper Cleaner absorbs waste ink carried by the Wiper Blade. If Wiper Cleaner cannot absorb waste ink any more, the
dirty Wiper Blade wipes the Print Head Nozzles again and this causes misfiring or damage the Print Head. Replace the Wiper
Cleaner regularly and clean the Wiper Blades and caps. Check if it is too dirty to wipe off the waste ink when you cannot solve
mis-firing by Nozzle Cleaning.
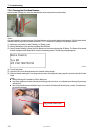
How to Check:
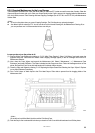
(1) See "6-1-2. Replacing the Wiper Cleaner and Cleaning the Caps / Wipers" and select [ Maintenance ] > [ Maintenance
Parts Exchange ] of the menu.
(2) Replace Wiper Cleaners as well as cleaning Wiper Blades and Caps. replace Flushing Plate Sponge and Flushing Plate
Felt too because the dirty surface of the Flushing Plate felt may give dame to the Print Head Nozzles. See "6-1-3.
Replacing Flushing Plate Sponge and Flushing Plate Felt".
(3) Confirm the inside of the printer and clean if necessary. See "Cleaning the inside of the printer and restart".
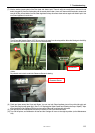
<Note>
Do not tilt the Wiper Cleaner Cassette; ink may get on your hands or clothing.
(4) Check the Wiper Cleaner, and if it is heavily soiled, replace it using the Cap Cleaning Kit (see “6-1-2. Replacing the Wiper
Cleaner and Cleaning the Caps / Wipers”). If the Wiper Cleaner is not heavily soiled, go on to the next step.
Step 3: Check the ink tubes and execute Powerful Cleaning.
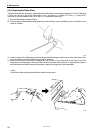
Open the Front Cover with both hands until it is locked with the stopper and check the ink tube inside if there is any "empty" air
space longer than 5 mm. If so, push the Stop Lever to release the lock when you close the Front Cover with both hands and
turn ON the printer, execute Powerful Cleaning to fill the tube with ink. Confirm by turning OFF the printer and open the Front
Cover. If not enough or the "empty" air is large, execute Initial Cleaning in [ Maintenance ] menu. to replace the old ink.
<Note>
As for White Ink, you do not have to load Maintenance Solution, go on the Initial Cleaning with White Ink Cartridge with
"Maintenance Cartridge" is indicated on the Display, and press the Stop Button to discontinue the operation after 10 seconds.
If the problem is not solved, proceed to the next step.