


GT-3 Series
5. Maintenance
39
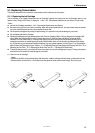
5-1-5. Replacing the Roller Felts
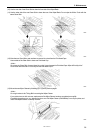
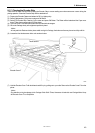
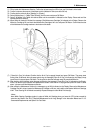
(1) Unscrew two screws and remove the Felt Support.
Felt Support
Felt
Fel
t
0071Y
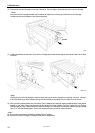
(2) Remove the used Felt.
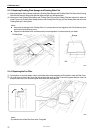
(3) Apply the new Felt to the Felt Support. Pay attention not to give damage to the Felt Support.
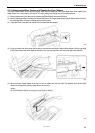
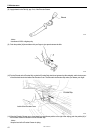
(4) Position the edge of the Felt Support "A" by putting the edge to the Carriage "B" and tighten the screw with a coin. After
fixing, check if the Felt Support is aligned straight.
<Note>
Wipe off the ink mist on the surface where the Carriage Rollers move on, with a clean and soft cloth soaked with alcohol.
(5) After all the Maintenance Parts are replaced, See "5-1-6. Cleaning the inside of the printer and restart" and then clean
and confirm the inside of the printer. Push the Stop Lever to release the lock when you close the Front Cover with both
hands and then turn ON the printer.
5-1-6. Cleaning the inside of the printer and restart
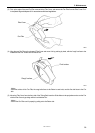
(1) Wipe off the front/back of the Clearance Sensor and around the Platen with a soft wet cloth with water. Use Wash Liquid
to remove the clogged ink.
<Note>
The dirt of the Clearance Sensor may stain the T-shirt in loading.
(2) Wipe off the dust on the T-shirt Tray with wet cloth.
(3) Wipe off the ink mist on the surface e.g. where the Carriage Rollers move on, with a clean and soft cloth soaked with
alcohol.
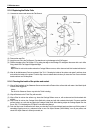
(4) Wipe off the ink mist on the Carriage Guide Shaft with a clean and soft cloth soaked with alcohol. Put some specified
grease (option) on a soft cloth and apply the Carriage Guide Shaft. After cleaning, adjust the Carriage Speed from the
menu. See "7-2-9. Adjusting the CR Speed" in the Instruction Manual.
(5) Push the Stop Lever to release the lock when you close the Front Cover with both hands and then turn ON the printer. If
something irregular occurs, e.g. abnormal noise or error "No Wiper Cleaner (CMYK/White)", turn off your printer, and
check if the Wiper Cleaner is correctly mounted, etc.