


GT-3 Series
5. Maintenance
45
Loading White Ink after Tube Cleaning
(1) Load the White Ink with full of Maintenance Solution in the Tube, the step (9) in the previous page. Insert the White Ink
Cartridge and select [ Maintenance ] > [ Load White ] from the menu and press OK.
(2) Select [ All Whites ] or one from W1-W4 and press OK. White Ink starts loading.
<Note>
The menu [ Initial Cleaning ] of the White Ink starts from loading Maintenance Solution, to load White Ink into the Tube
smoothly. After Tube Cleaning, when the Tubes are filled with Maintenance Solution, select [ Load White ] to load White
Ink.
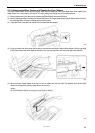
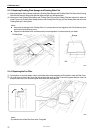
One-by-one Tube Cleaning
(1) Fill the bottle with Maintenance Solution. Confirm that at least more than 250 ml per one Print Head is in the bottle.
(2) Confirm in advance the amount of the Waste Ink in the Waste Ink Tank (more than 500 ml).
(3) Confirm that the printer is either [ Standby ] or [ Ready ].
(4) Select [ Maintenance ] > [ White Tube Cleaning ] from the menu and press OK Button.
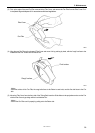
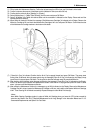
(5) Select [ White-1 (or White-2 to White-4) ] then the message [ Set Maintenance Cartridge ] is indicated. Remove the White
Ink Cartridge of W1 and insert the Maintenance Cartridge to W1 slot. and press OK Button. Confirm that the tube of the
Maintenance Cartridge reaches to the bottom of the bottle. [ Close Air-in Cap ] is indicated. Confirm that the Air-in Cap is
capped (closed) and press OK Button.
<Note>
White Ink is retrieved only when [ All Whites ] is selected.
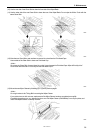
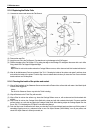
(6) The pump starts turning. After 30 seconds, when the peep sounds ring, the message [ Open Air-in Cap ] is indicated on
the Control Panel. Uncap (open) the air-in cap and press OK button. The air goes into the tube and wash away the
remained White Ink. It takes about 10 minutes to wash one tube.
(7) After washing with air bubbles, when the peep sounds ring, the message [ Close Air-in Cap ] is indicated on the Control
Panel, which is to remove the air bubbles with Maintenance Solution Close the Air-in Cap again and press OK button.
(8) After refilling the Maintenance Solution, the message of selecting Print Head menu is indicated. Remove the
Maintenance Cartridge from W1 slot and insert well-shaken White Ink Cartridge. Tube Cleaning W1 is finished
successfully.
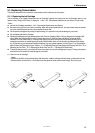
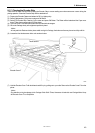
5-2-3. Waste Ink Disposal
Use a polyethylene tank for additional Waste Ink Tank. Confirm in advance the amount of the Waste Ink when you do the
maintenance, especially when you execute the maintenance menu of Initial Cleaning and White Tube Cleaning. Deal with
care because it is heavy.
(1) Prepare a new polyethylene tank.
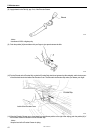
(2) Pull off the Waste Ink Tube carefully and insert it to the new Waste Ink Tank.
<Note>
Make sure that the Waste Ink should flow in the tube without bend.
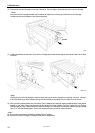
(3) Remove the full Waste Ink Tank and cap tightly and carefully.
(4) Install the new Waste Ink Tank in a proper position.
<Note>
Dispose the used waste ink, pretreatment, maintenance solution (all water-based) or other wastes in accordance with your
local regulations. Or make contact to your dealer.