


15-10
Cisco ASA 5500 Series Configuration Guide using ASDM
Chapter 15 Completing Interface Configuration (TransparentMode, 8.4 and Later)
Completing Interface Configuration in Transparent Mode (8.4 and Later)
Do not use this procedure for Management interfaces; see the “Configuring a Management Interface
(ASA 5510 and Higher)” section on page 15-11 to configure the Management interface.
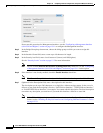
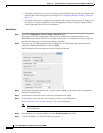
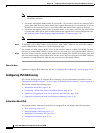
Step 3 In the Bridge Group drop-down menu, choose the bridge group to which you want to assign this
interface.
Step 4 In the Interface Name field, enter a name up to 48 characters in length.
Step 5 In the Security level field, enter a level between 0 (lowest) and 100 (highest).
See the “Security Levels” section on page 15-2 for more information.
Note Do not click the Dedicate this interface to management only check box; see the “Configuring
a Management Interface (ASA 5510 and Higher)” section on page 15-11 for this option.
Step 6 If the interface is not already enabled, check the Enable Interface check box.
Note The Channel Group field is read-only and indicates if the interface is part of an EtherChannel.
Step 7 (Optional) In the Description field, enter a description for this interface.
The description can be up to 240 characters on a single line, without carriage returns. In the case of a
failover or state link, the description is fixed as “LAN Failover Interface,” “STATE Failover Interface,”
or “LAN/STATE Failover Interface,” for example. You cannot edit this description. The fixed description
overwrites any description you enter here if you make this interface a failover or state link.
Note (ASA 5510 and higher, single mode) For information about the Configure Hardware Properties
button, see the “Enabling the Physical Interface and Configuring Ethernet Parameters” section
on page 12-23.