


5-5
Cisco CRS-1 Carrier Routing System SIP and SPA Hardware Installation Guide
OL-7113-05
Chapter 5 Installing and Removing a SIP
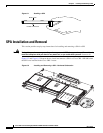
SIP Installation and Removal
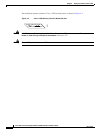
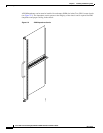
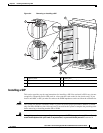
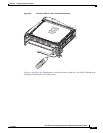
Figure 5-4 Removing or Installing a SIP
Installing a SIP
This section provides step-by-step instructions for installing a SIP. You can install a SIP in any slot not
occupied by a Route Processor (RP) card (or a fan controller card on the 16-slot chassis only). If you
install a new MSC or SIP, you must first remove the PLIM impedance carrier card from the available slot.
Caution The system can indicate a hardware failure if you do not follow proper procedures. Remove or install
only one SIP or PLIM at a time. Allow at least 15
seconds for the system to complete the preceding tasks
before removing or installing another SIP or PLIM.
Warning
During this procedure, wear grounding wrist straps to avoid ESD damage to the card. Do not directly
touch the backplane with your hand or any metal tool, or you could shock yourself.
Statement 94
1 Captive screw 4 Guide pins
2 Ejector lever 5 Direction of installation or removal
3 Septum
138047
5
2
3
0
S
P
A
B
A
Y
2
S
P
A
B
A
Y
5
S
P
A
B
A
Y
4
S
P
A
B
A
Y
1
S
P
A
B
A
Y
3
S
P
A
B
A
Y
0
3
3
0
1
3
3
0
5
3
4
4
2