


57
Cisco XR 12000 Series Router Ethernet Line Card Installation
OL-7861-01
Verifying and Troubleshooting the Installation
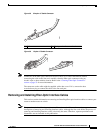
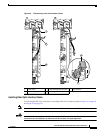
Step 3 Use a screwdriver to loosen the captive installation screws at the ends of the line card cable-management
bracket.
Step 4 Detach the line card cable-management bracket and optical fiber cable bundle from the line card and
place it carefully out of the way.
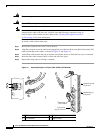
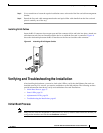
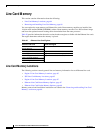
Installing RJ-45 Cables
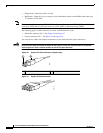
Insert the RJ-45 connector into an open port until the connector clicks and locks into place. Attach one
cable between each line card interface and the device to which the line card is connected. Figure 44
shows the relationship between the RJ-45 interface on the line card and the cable connector.
Figure 44 Attaching RJ-45 Copper Cables
Verifying and Troubleshooting the Installation
After installing the hardware, you need to look at the LEDs to verify that the Ethernet line card was
installed correctly. If it was not, you need to troubleshoot to find the problem. The following sections
provide information about how to verify and troubleshoot line card installations:
• Initial Boot Process, page 57
• Status LEDs, page 58
• Alphanumeric LEDs, page 59
• Troubleshooting the Installation, page 63
Initial Boot Process
Note Many new line cards are designated as administratively down by default. Status LEDs are off until you
configure the interfaces and use the no shutdown command.
25059
FAST ETHERNET