


VPN
SSL VPN
Cisco RV320/RV325 Administration Guide 101
9
STEP 4 Click on Virtual Passage page. Choose Connect using Virtual Passage. A
warning message window pops out. Click on Install button (install
Xtunnel_WOW64.cab) to establish a tunnel.
STEP 5 After the Virtual Passage window finishes loading, the tunnel is connected. The
PC will get the protected subnet IP from RV320/RV325 and be able to access the
LAN resource.
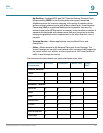
Status
Provides the status of the SSL VPN tunnels. A user can be logged out from this
window.
To open this page, select SSL VPN > Status in the navigation tree.
The SSL Status Table displays:
• User—Name of the user.
• Group—Associated group.
• IP—IP address.
• Login Time—Time user logged into the tunnel.
To log out a user, click the icon in the Logout column.
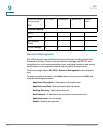
Group Management
Group management controls user groups, including access to resources. An
administrator can create multiple groups of users, where each group has access
to different set of resources in the LAN. Typical scenario has two groups of users,
where one group contains employees and the other group contains business
partners. Although this device supports multiple domains, it is common to see a
small business with a single domain that is tied to a particular authentication
database, for example, a local database, RADIUS, or LDAP.
To open this page, select SSL VPN > Group Management in the navigation tree.
The SSL Status Table contains the following information:
• Group—Name of the group.
• Domain—Database from where the user is authorized.
• User—Usernames and types. Click Details to display.