


8 IP Routing
8-4
VPN 3000 Concentrator Series User Guide
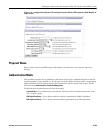
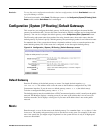
Network Address
Enter the destination network IP address that this static route applies to. Packets with this destination
address will be sent to the
Destination below. Used dotted decimal notation; e.g., 192.168.12.0.
Subnet Mask
Enter the subnet mask for the destination network IP address, using dotted decimal notation (e.g.,
255.255.255.0). The subnet mask indicates which part of the IP address represents the network and
which part represents hosts. The router subsystem looks at only the network part.
The Manager automatically supplies a standard subnet mask appropriate for the IP address you just
entered. For example, the IP address
192.168.12.0 is a Class C address, and the standard subnet mask
is
255.255.255.0. You can accept this entry or change it. Note that 0.0.0.0 is not allowed here, since
that would resolve to the equivalent of a default gateway.
Metric
Enter the metric, or cost, for this route. Use a number from 1 to 16, where 1 is the lowest cost. The
routing subsystem always tries to use the least costly route. For example, if a route uses a low-speed line,
you might assign a high metric so the system will use it only if all high-speed routes are unavailable.
Destination
Click a radio button to select the outbound destination for these packets. You can select only one
destination: either a specific router/gateway, or a VPN Concentrator interface.
Router Address
Enter the IP address of the specific router or gateway to which to route these packets; that is, the IP
address of the next hop between the VPN Concentrator and the packet’s ultimate destination. Use dotted
decimal notation; e.g.,
10.10.0.2.
Interface
Click the drop-down menu button and select a configured VPN Concentrator interface as the outbound
destination. The menu lists all interfaces that have been configured.
For example, in a LAN-to-LAN configuration where remote-access clients are assigned IP addresses that
aren’t on the private network, you could configure a static route with those addresses outbound to the
Ethernet 1 (Private) interface. The clients could then access the peer VPN Concentrator and its networks.
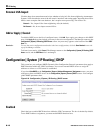
Add or Apply / Cancel
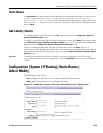
To add a new static route to the list of configured routes, click Add. Or to apply your changes to a static
route, click
Apply. Both actions include your entries in the active configuration. The Manager returns to
the
Configuration | System | IP Routing | Static Routes screen. Any new route appears at the bottom of the
Static Routes list.