


Chapter 3
Advanced Configuration
21
Simultaneous Dual-Band Wireless-N Gigabit Router
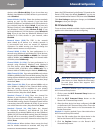
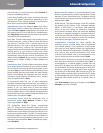
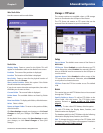
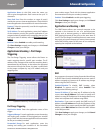
Current Folder The current folder is displayed.
Folder Name The available folders are listed by Folder
Name.
Enter into Folder To display sub-folders, click this button.
Select Select a folder.
Return to Upper Folder To return to the previous folder,
click this button.
Access
Specify which user groups have read-and-write or read-
only access to the folder. (To create user groups, refer to
Create or Edit a Group Account, page 24.)
Available Groups To allow a group access to the folder,
select it, and then click the >> button.
Groups with Access To block a group from accessing the
folder, select it, and then click the << button.
Click Save Settings to apply your changes, or click Can-
cel Changes to clear your changes. Click Close to exit the
screen.
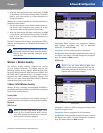
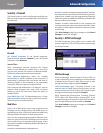
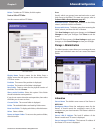
Format Disk
Enter a partition’s name Create a name for the partition.
(If your disk was formatted with multiple partitions,
then the formatting will delete them and create a single
partition.)
To format the disk as FAT32, click Format and follow the
on-screen instructions. To cancel the formatting, click
Cancel.
Format Disk
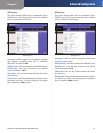
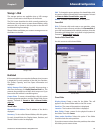
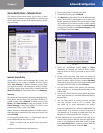
Storage > Media Server
The storage options are available when a USB storage
device is connected to the USB port of the Router.
If you have UPnP AV-enabled (or DLNA-certified) devices
in your home, then you can use the Router as a media
server. Examples of UPnP AV-enabled devices include a
digital media adapter, a gaming console with a built-in
media player, or a digital picture frame.
For example, if you have a digital media adapter that sends
content to your entertainment system, then the digital
media adapter can locate the Router using the UPnP AV
standard. The folders you specify can then be accessed
and played by the digital media adapter.
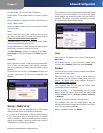
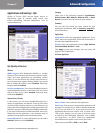
Storage > Media Server
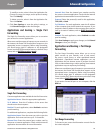
Setup
Server Name The default server name of the Router is
WRT610N.
UPnP Media Server To use the Router’s media server
function, select Enabled. Otherwise, select Disabled.
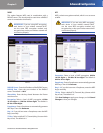
Database
This section lets you select content to add to the database
of the Router’s media server.
Specify Folder to Scan To add a media folder to
the database of the Router’s media server, click this
button. The Media Folder screen appears. Proceed to
Add a Media Folder, page 22.
Last scanning time The last time the media server
scanned for content is displayed.
Auto-scan every __ To automatically scan the media
folders, select this option. Then select the appropriate
interval: 2 Hours (default), 6 Hours, 12 Hours, 24 Hours,
or 48 Hours.
Scan All To scan all media files, click this button.
The database table lists the media folders with the
following information: Display Name, Partition, and Folder.
Scan To scan a folder, click Scan.
Delete To delete a folder, click Delete.