


Scanning
Scanning
23
Adjusting your scanner settings
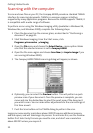
When using your computer to scan documents, the scanner settings are
controlled by the application you are using. If the application uses the TWAIN
dialog, you can control the resolution, contrast, brightness, and more.
When scanning with the A3000 Scan button, your scan settings are controlled by
the A3000 settings utility. See “Using the settings utility” on page 10 for more
information.
Scanning with the scan button
To perform a scan using the Scan button on the A3000 control panel, complete
the following steps:
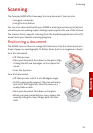
1 Place the document on the scanner glass, as described in “Positioning a
document” on page 21
2 Press the Scan button.
3 Select the Scan To destination. Use the up and down arrow buttons to
cycle through the available choices. For a full description of the scan
destinations, see below.
4 Press the Start button.
The A3000 will then contact your PC and perform the scan.
You can scan to a folder, scan to email, scan to your PC fax modem, or scan to an
application, as explained in the following sections.
Scanning to a folder
The first Scan To menu destination is a folder on your PC. This is initially your My
Pictures folder, located in your My Documents directory. You can change your
folder and default file type with the A3000 settings utility.
Once scanned, the files will be given the filename of Month - Day - ###.ext,
where ### indicates the number of the image scanned that day. For example,
the second image scanned on May 1 would be named May-01-002.JPG.
The file extension depends on the file type selected for your scan.