


Scanning 279
After you configured settings, go to "Sending the Scanned File on the
Network" on page 279.
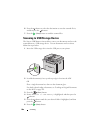
Sending the Scanned File on the Network
1
Load the document(s) face up with top edge in first into the ADF.
OR
Place a single document face down on the document glass.
For details about loading a document, see "Loading an Original Document
on the ADF" on page 296.
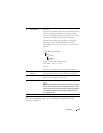
2
Press the
(Scan)
button.
3
Press the button until
Scan to Network
is highlighted, and then
press the button.
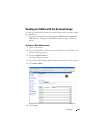
4
Ensure that
Scan to
is highlighted, press the button.
5
Press the button to select
Network (Computer)
or
Network
(Server)
, or
Search Address book
, and then press the
button.
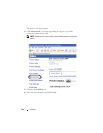
Network (Computer)
: Stores the scanned image on the computer by
using the SMB protocol.
Network (Server)
: Stores the scanned image on the server by using
the FTP protocol.
Search Address Book
: Select the server address registered in
Address Book.
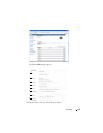
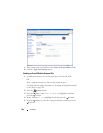
8 Login Password Enter the password corresponding to the above login
name.
NOTE: NOTE: Empty password is not valid in the Scan to
Server/Computer feature. Ensure that you have a valid
password for the user login account. (See "Confirming a
Login name and Password" on page 261 for details on how to
add a password in your user login account).
9 Confirm Login
Password
Re-enter your password.
10 Port Number Enter the Server Port Number. If you are unsure, you can
enter the default value of 139 for SMB and 21 for FTP.