


Replacing the System Board | 113
51
Replacing the System Board
WARNING: Before working inside your computer, read the safety information
that shipped with your computer and follow the steps in "Before You Begin" on
page 11. After working inside your computer, follow the instructions in "After
Working Inside Your Computer" on page 13. For additional safety best practices
information, see the Regulatory Compliance Homepage at dell.com/
regulatory_compliance.
NOTE: Your computer’s Service Tag is stored in the system board. You must enter
the Service Tag in the system setup after you replace the system board.
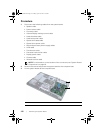
Procedure
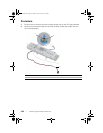
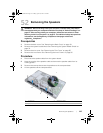
1 Align the screw holes on the system board with the screw holes on the computer
base.
2 Replace the screws that secure the system board to the computer base.
3 Connect the following cables to the system board:
• Speaker cable
• Power-button cable
• Converter cable
• Volume/Display-settings control cable
• Hard-drive power cable
• Hard-drive data cable
• Optical-drive power cable
• Optical-drive data cable
• Main and processor power-supply cables
• LVDS cable
• Touchscreen cable
• Processor heat-sink fan cable
• Display-power cable
• Camera cable
• Infrared-receiver cable
OM_Book.book Page 113 Friday, April 27, 2012 3:23 PM