


Replacing the Power-Button Assembly | 121
55
Replacing the Power-Button Assembly
WARNING: Before working inside your computer, read the safety information
that shipped with your computer and follow the steps in "Before You Begin" on
page 11. After working inside your computer, follow the instructions in "After
Working Inside Your Computer" on page 13. For additional safety best practices
information, see the Regulatory Compliance Homepage at dell.com/
regulatory_compliance.
Procedure
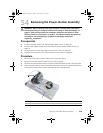
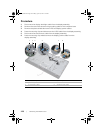
1 Place the power-button assembly in the computer base and ensure that the power
button fits in the slot on the computer base.
2 Align the screw holes on the power-button assembly with the screws holes on the
computer base and replace the screws that secure the power-button assembly to
the computer base.
3 Route the power-button cable through the routing guides and connect the
power-button cable to the system board.
Postrequisites
1 Replace the inner frame. See "Replacing the Inner Frame" on page 97.
2 Replace the trim cover. See "Replacing the Trim Cover" on page 89.
3 Replace the system-board shield. See "Replacing the System-Board Shield" on
page 33.
4 Replace the back cover. See "Replacing the Back Cover" on page 21.
OM_Book.book Page 121 Friday, April 27, 2012 3:23 PM