


Installing System Components 93
1x8 SAS Backplane Board
Removing the 1x8 SAS Backplane Board
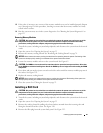
CAUTION: Only trained service technicians are authorized to remove the system cover and access any of the
components inside the system. See your Product Information Guide for complete information about safety
precautions, working inside the computer, and protecting against electrostatic discharge.
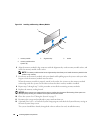
1 Remove the front bezel, if attached. See
"Removing the Bezel" on page 50
.
2 Turn off the system and attached peripherals, and disconnect the system from the electrical outlet
and peripherals
.
3
Open the system. See "Opening the System" on page 53.
4
Disconnect the cables from the SAS controller daughter card on the expansion bay bracket and remove
the cables from the center fan bracket.
5
Remove the fans from the center fan bracket. See "Removing and Installing a Fan" on page 65.
6
Remove the center fan bracket. See "Removing the Center Fan Bracket" on page 81.
7
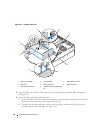
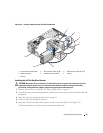
D
isconnect
all c
able
s f
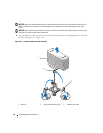
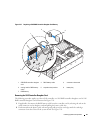
rom the SAS backplane. See Figure 6-3.
8
U
nlock and slide the hard drive(s) out of the system at least 5 cm (2 inches)
.
NOTICE: If you completely remove the drives from the system, you must note the number of each drive and
temporarily label them before removal, so you can replace them in the same locations.
9
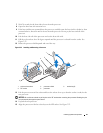
R
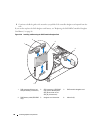
emove the SAS backplane:
a Lift the spring-loaded blue retention pin
to release t
he backplane
and t
hen slide the backplane
upward.
b When the backplane cannot slide upward any farther, pull the backplane toward the back of the
system to remove it from the retention hooks.
Installing the 1x8 SAS Backplane Board
1
Insert t
he backplane
into the system behind the drive bays.
Ensure that
all c
ables
are out of the way w
hen installing the new backplane.
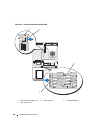
2 Align the backplane with the retention hooks on the chassis, then fit the backplane
onto t
he
retention hooks.
3 Slide the backplane downward until the blue retention pin snaps into place.
4
R
econnect
all c
able
s t
o the backplane, being very careful to install them in their original locations
.
5
Reinsert t
he hard drives
.
6
Reinstall the fans in the center fan bracket. See "Removing and Installing a Fan" on page 65.
7
Reinstall the center fan bracket. See "Replacing the Center Fan Bracket" on page 81.
8
Close the system. See "Closing the System" on page 53.