


Using the Printer 41
From a PictBridge-Enabled Camera
Your printer supports PictBridge-compatible cameras.
To use your printer with a digital camera:
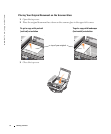
1 Insert the rectangular end of the USB cable that came with your Pictbridge-compatible
digital camera into the Pictbridge connector of the printer.
2 Insert the other end of the USB cable into the digital camera.
3 Refer to the instructions included with your camera for usage information.
Printing Borderless Photos
1 For best results, load photo/glossy paper in the paper support and make sure the print side
is facing down. For more information, see "Print Media Guidelines for the Paper Support"
on page 34.
2 Make sure you have a color cartridge and a photo cartridge (sold separately) installed. For
more information, see "Replacing Ink Cartridges" on page 71
3 With your document open, click File→Print.
4 To customize your print settings, click Preferences, Properties, Options, or Setup
(depending on the program or operating system).
The Printing Preferences dialog box appears.
5 On the Print Layout tab, click Borderless.
6 When finished customizing your photo, click OK.
7 Click OK or Print (depending on the program or operating system).
Printing More Than one Page on a Sheet of Paper
1 Make sure you have paper loaded in the paper support. For help, see "Load Plain Paper Into
the Paper Support" on page 34.
2 With your document open, click File→Print.
3 Click Properties, Options, Setup, or Preferences (depending on the program or operating
system).
The Printing Preferences screen displays along with the I Want To menu.
4 From the Print Layout tab, select N-up.
5 Select the number of pages to print on each page.