


26 Using your printer
www.dell.com/supplies | support.dell.com
Scanning
You can scan using your operator panel and software.
First, load your document. For help, see page 17.
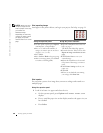
Scanning photos
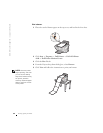
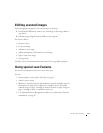
1 Place your photo on the scanner glass. For help, see page 17.
NOTE: Make sure the
upper left corner of the
front of the photo aligns
with the arrow.
2 Open the Dell All-In-One Center. For help, see page 7.
3 Click Preview Now.
4 Adjust the dotted lines to fit around the portion of the image you want to
print.
5 Select your scan destination from the drop-down box.
6 When you are finished customizing your image, click Scan Now.
7 When your document has finished processing, it will open in the program
you chose.
Using the operator panel: Using the printer software
1 Make sure your printer is on.
2 Press Select Software.
3 The scan destination that you last
selected (or the factory default)
displays.
4 Press + to scroll through the list of
scan destinations.
5 When your preferred scan destination
displays, press Select.
6 Press Scan to begin a scan job using
the current settings.
1 Make sure your computer and your
printer are on.
2 Open the Dell All-In-One Center. For
help, see page 7.
The All-In-One Main Page appears.
3 Click Preview Now to see your
scanned image.
4 Adjust the dotted lines to fit around
the part of the image you want to
print.
5 From the Send scanned image to:
drop down box, select your scan
destination.
To further customize your scan job,
click See More Scan Settings.
6 When you are finished customizing
your image, click Scan Now.