


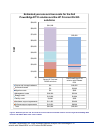


11
Principled Technologies, Inc.: Initial investment payback analysis: Dell PowerEdge R710
solution with VMware ESX vs. HP ProLiant DL385 solution
Creating the virtual machine with vSphere
1. Click Start, All Programs, VMware, VMware vSphere client.
2. Enter the IP address or hostname, user name, and password. Click Login.
3. Click the Virtual Machines tab.
4. Right-click, and choose New Virtual Machine.
5. Choose Custom, and click Next.
6. Assign a name to the virtual machine. Click Next.
7. Select a datastore for the virtual machine files. We chose the OS Datastore. Click Next.
8. Choose Virtual Machine Version 7 to utilize build 148592 of ESX. Click Next.
9. Choose Microsoft Windows, then Microsoft Windows Server 2008 (64-bit). Click Next.
10. Choose two virtual processors. Click Next.
11. Choose 12800MB RAM. Click Next.
12. Click None for the number of NICs. Click Next.
13. Choose LSI Logic SAS as the SCSI controller. Click Next.
14. Choose to create a new virtual disk. Click Next.
15. Make the OS virtual disk size 30 GB, and click Next.
16. Keep the default virtual device node, and click Next.
17. Click Finish.
18. Right-click the VM, and choose Edit Settings.
19. On the Hardware tab, click Add…
20. Choose Ethernet Adapter, and click Next.
21. Choose VMXNet 3, and click Next.
22. Repeat steps 19 through 21 twice more to add the iSCSI dedicated NICs.
23. Click Finish, and click OK.
Installing the guest operating system
1. Insert the installation DVD for Windows Server 2008 x64 into the DVD drive.
2. In vSphere, right-click the virtual machine, and choose CD/DVD drive.
3. Click the Host Device radio button, and choose the appropriate drive.
4. Click OK.
5. Right-click the machine, and choose Power, Power On.
6. Right-click the machine, and choose Open console.
7. Choose the language, time and currency, and keyboard input. Click Next.
8. Click Install Now.
9. Choose Windows Server Enterprise (Full Installation). Click Next.
10. Accept the license terms, and click Next.
11. Click Custom.
12. Click the Disk, and click Drive options (advanced).
13. Click New, Apply, Format, and then click Next.
14. Let the installation process continue. The VM will reboot several times.
15. After the installation completes, click OK to set the Administrator password.
16. Enter the administrator password twice, and click OK.
17. When the operating systems finishes booting, choose VM, Guest, Install/Upgrade VMware Tools.
18. On the information Install VMware Tools screen, click OK.
19. On the autoplay menu, click Run setup.exe.
20. On the Welcome screen, click Next.
21. On the Setup Type screen, choose Typical, and click Next.
22. Click Install.
23. On the various Windows Security screens, click Install each time.
24. Click Finish to complete the installation.
25. Click Yes to reboot the VM.
26. Log into the VM after reboot.
27. Click Start, Control Panel, and double-click System.
28. Click Change Settings.
29. Click Change.
30. Enter the new computer name, and click OK.