


41 | Configuring a Stateful HA Pair
Configuring HA Monitoring Settings
After configuring the HA settings, you need to configure the
Monitoring settings for the LAN or WAN.This includes
configuring unique IP addresses for each appliance in the
Stateful HA pair. You will need to log into the appliances using
these IP addresses in order to complete the registration
process from within SonicOS, which will allow license sharing
and synchronization.
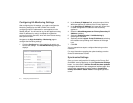
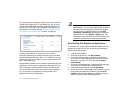
Navigate to the High Availability > Monitoring page to
configure the Monitoring settings.
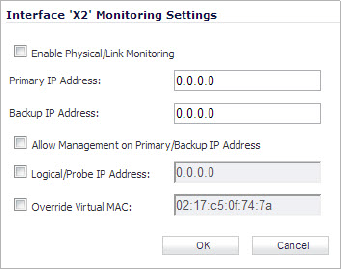
1. Click the Configure icon of the Interface for which you
want to edit settings. The Edit HA Monitoring dialog box
displays.
2. In the Primary IP Address field, enter the unique LAN or
WAN management IP address of the Primary appliance.
3. In the Secondary IP Address field, enter the unique LAN
or WAN management IP address of the Secondary
appliance.
4. Select the Allow Management on Primary/Secondary IP
Address checkbox.
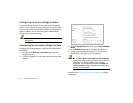
5. Optionally Enable Physical / Link Monitoring by
selecting the checkbox.
6. Optionally enable Logical / Probe IP Address by selecting
the checkbox and providing the IP Address of the target
host.
7. Click OK.
You can repeat these steps to configure Monitoring on other
interfaces.
For more information regarding the optional settings, see the
SonicOS Administrator’s Guide.
Synchronize Settings
Once you have configured the HA setting on the Primary Dell
SonicWALL security appliance, click the Synchronize Settings
button. You should see a HA Peer Firewall has been updated
message at the bottom of the management interface page. Also
note that the management interface displays Logged Into:
Primary SonicWALL Status: Active in the upper-right-hand
corner.