


Installing System Board Options 9-15
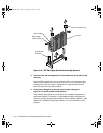
5HPRYHWKHFRP SXWHUFR Y HUDFFRUGLQJ WRWKHLQVWUXFWLRQV LQ ´5HPR Y LQ J
WKH&RPSXWHU&RYHUµLQ&KDSWHU
&$87,216HH´3URW HFWLQ J$JDLQVW(OHFWUR VWDWLF'LVFK DUJHµLQWKHVDIHW\
LQVWUXFWLRQVDWWKHIURQWRIWKLV JXLG H
7RDFFHVVWKHEDWWHU\ RQW KHV\V WHPERDUGURWDWH WKHSRZHUVXSSO\ DV
GHVFULEHGLQ´5RWDWLQJ WKH3RZHU6XSSO\$ZD\)URPWKH6\VWHP%RDUGµ
LQ&KD SWHU
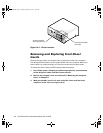
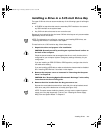
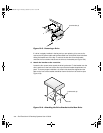
NOTE: If a CD-ROM drive or hard-disk drive in the upper 5.25-inch drive bay
obstructs your access to the battery, you may find it helpful to remove the front
bezel and slide the drive forward slightly to provide more room for you to work.
See the sections in Chapter 10 titled “Removing and Replacing the Front Bezel”
and “Installing a Drive in a 5.25-Inch Drive Bay” for instructions.
/RFDWHWKHEDWWHU\DQGUHPRYHLW
The battery is mounted in a socket labeled “BATTERY” at the upper front-right
corner of the system board (as you face the side of the system) (see Figure 9-1).
&$87,21,I\RXSU\WKHEDWWHU\RXWRILWVVRFNHWZLWKDEOXQWREMHFWEH
FDUHIXOQRW WRWRXFKWKHV\VWHPERDUGZLWK WKHREMHFW0DNHFHUWDLQWKDW
WKHREMHFWLVLQVHUWHGEHWZHHQWKHEDWWHU\DQGWKHVRFNHWEHIRUH
DWWHPSWLQJWRSU\RXWWKHEDWWHU\2WKHUZLVH\RXPD\GDPDJHWKHV\V
WHPERDUGE\SU\LQJRIIWKHVRFNHWRUE\EUHDNLQJFLUFXLWWUDFHVRQWKH
V\VWHPERDUG
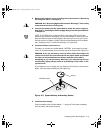
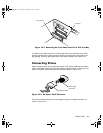
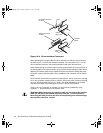
Pry the battery out of its socket with your fingers or with a blunt, nonconductive
object, such as a plastic screwdriver (see Figure 9-9).
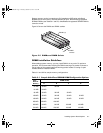
)LJXUH6\VWHP%DWWHU\DQG%DWWHU\6RFNHW
,QVWDOOWKHQHZEDWWHU\
Orient the battery with the side labeled “+” facing up. Then insert the battery
into the socket, and snap it into place.
BATTERY socket
battery
23186bk0.bk Page 15 Thursday, October 29, 1998 11:07 AM