


32
Using the Projector
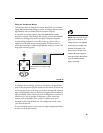
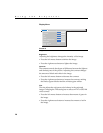
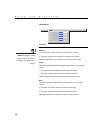
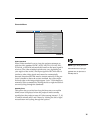
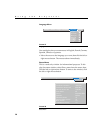
Image Menu
FIGURE 25
Image menu
NOTE: Some screen savers
interfere with the operation of
Auto Image. If you’re experiencing
problems, try turning your screen
saver off, then turning Auto Image
off and back on.
Overscan
This option crops all the edges of the image to remove noise gen-
erated on the edges by your source. This option is available for
video sources only.
Image Position
This setting allows you to re-position a 16x9 or native mode
video image. Select among top, bottom, and center by highlight-
ing Image Position in the menus and clicking either mouse but-
ton to cycle through the options.
Auto Image
The projector automatically adjusts tracking, signal synchroniza-
tion and vertical and horizontal position for most computers
(Auto Image does not apply to video sources). If you want to
adjust these features manually, you must turn off
Auto Image
first
by highlighting Auto Image in the Image menu and clicking the
left or right mouse button to select “off”.
NOTE: When you connect an
HDTV source, the projector
automatically displays the image in
16x9 format.
Resize
This option works differently for computer and video sources.
For computer sources,
Resize
automatically resizes the image by
scaling it up or down. It only affects computer images that are not
the projector’s native resolution. When
Resize
is on, the projector
makes the best fit of the image to the computer screen. If you turn
Resize
off (by highlighting it in the Image menu and clicking the
left or right mouse button to select “off”), the image may be either
cropped or too small for the screen.
Display Audio Image Controls Language Status
>
>
Overscan
Auto image on
Resize on
on
Image position top
Manual sync
Manual tracking
Horizontal position
Vertical position
Zoom