


11
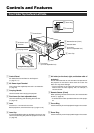
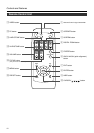
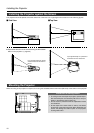
Control Panel on the Projector
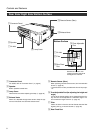
Controls and Features
1 STAND BY Indicator
Light on : In stand by mode.
Blinking : In cool down mode.
2 OPERATE Indicator
Light on : During projection.
3 OPERATE button
When this projector is in standby mode, pressing this but-
ton for more than 1 second will turn the projector on and
cause the OPERATE indicator to light up. Press it one sec-
ond or more again, and the projector goes into the cool
down mode and finally into stand by mode. (☞ page 25)
* The OPERATE button will not work within approximately 1
minute of the light-source lamp being turned on. Hence
wait about 1 minute before pressing.
4 VOLUME ª / · buttons
Use these buttons to adjust the sound volume.
(☞ page 27)
5 EXIT button
Press this button to display the previous menu. (For exam-
ple, from sub menu to main menu). Pressing this button
when the main menu is displayed will erase the menu.
(☞ page 35)
6 ENTER button
Press this button to show the next menu (For example, from
main menu to sub-menu). It is also used when “ENTER” is
displayed against an item on the menu screen, or to choose
the “Reset” option etc. (☞ page 35)
7 HIDE button
Use this button to temporarily halt the audio and video out-
put. Press again to resume. (☞ page 29)
8 TEMP Indicator
Blinking : Indicates the temperature inside the projector is
abnormally high.
9 LAMP Indicator
Light on : Indicates the lamp has been used for more
than1900 hours.
Blinking : Indicates the lamp has been used for more than
2000 hours.
Please change the lamp. (☞ page 10, 43, 51)
p VIDEO button
Use this button to select a device such as a video con-
nected to the VIDEO IN terminal (VIDEO or Y/C Input ter-
minal) of the projector. (☞ page 25)
q PC button
Use this button to select a device connected to the PC1,
PC2 or PC3 terminals. (☞ page 26)
w H-KEYSTONE button
Use this button to remove the horizontal trapezoidal distor-
tion of the image projected on the screen. (☞ page 30)
e V-KEYSTONE button
Use this button to remove the vertical trapezoidal distortion
of the image projected on the screen. (☞ page 30)
r MENU button
Use this button to enter or exit the menu mode. When the
main menu is displayed, pressing this button will cause the
menu to disappear. (☞ page 35)
t CURSOR ( ᮡ/ ᮢ / ᮤ / ᮣ ) buttons
These buttons are used in the menu mode to select an
item and to set or adjust the value in the sub-menu.
(☞ page 35)
y PRESET button
This PRESET button works as a reset button for the
[VOLUME] [V-KEYSTONE] [H-KEYSTONE] adjustments
done on the control panel and remote control and the
[DIGITAL ZOOM] and [SCREEN „] adjustments done on
the remote control. (☞ page 28, 30)
When adjusting the volume, keystone or digital zoom (when
the setting is displayed) the adjusted value is reset to that
which was set when the projector was shipped from the
factory. This button does not work for the items in the menu
(submenu). (☞ page 35)
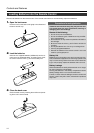
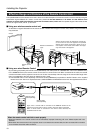
About Cool Down mode
After projection, the heated lamp will go through a 90 sec-
onds cool-down period known as the cool down mode. This
function is to prevent heat from the heated lamp causing
damage and deformation to the internal components of the
projector. It also prevents lamp breakage and shortened
lamp life.
The Cool down mode is indicated by the blinking STAND
BY indicator. During the cool down mode, pressing the
OPERATE button will not turn on the projector.
After the cool down process is completed, the projector will
automatically change to stand by mode.
Note
Please do not pull out the plug from the power outlet during
cool down mode. Please also do not block the exhaust vents
by standing the projector on its end or laying it on its side.