


26
PC 1
PC 2
PC 3
Y/C
VIDEO
Audio-Vol 12
Digital Zoom x12
Vert.Keystone
0
Horiz.Keystone
0
3.
4.
Tele side
Wide side
Near side
Far side
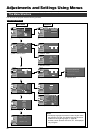
Basic Operations
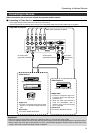
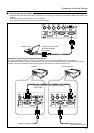
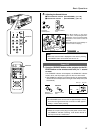
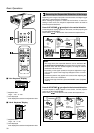
Ⅵ Display using the direct buttons
The direct buttons enable direct switching and
operation without having to go through the
menu.
Input mode can be selected by
pressing the PC button or the
VIDEO button.
When the DIGITAL ZOOM, VOLUME, V-KEYSTONE
or H-KEYSTONE buttons are pressed, the level bar
of the function is displayed.
VIDEO
Screen display
PC
PC
Projector:
Control Panel
Remote Control
Unit
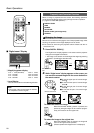
PC1 PC2 PC3
PC1
Screen display
When “Line display” (☞ page 39)
is set to “5 sec” : After changing an
input , the new selection will ap-
pear on the screen for about 5 sec-
onds.
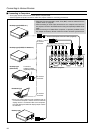
Ⅵ To select a computer or other devices connected to PC1,
PC2 or PC3 : Press PC
Upon pressing the button, the input mode changes as follows.
PC1 : Projects image from PC1 input terminal
on the right hand side of the projector.
PC2 : Projects image from PC2 input terminal
on the right hand side of the projector
PC3 : Projects image from PC3 input terminal
on the right hand side of the projector.
When “Line display” (☞ page 39)
is set to “5 sec”: after changing an
input, the new selection will appear
on the screen for about 5 seconds.
Notes
• Sound is formed from sound signals connected to the AUDIO ter-
minal.
• When no image is input to the selected input terminal, the mes-
sage “No Input” is displayed on the screen. (☞ page 49)
• When the PC2 input terminal is used, “PC2(BNC)” must be se-
lected from the “Options” item in the main menu. (☞ page 39)
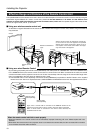
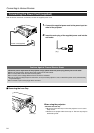
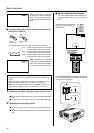
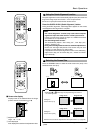
3.
Adjusting the Zoom Ring (the screen size) for DLA-
Ⅵ To enlarge the screen size: Turn the zoom ring towards the ‘Wide’
side.
Ⅵ To reduce the screen size: Turn the zoom ring towards ‘Tele’ side.
4.
Adjusting the Focus Ring (Focus)
Ⅵ To focus on nearer points: Turn the focus ring towards the ‘Near’
side.
Ⅵ To focus on farther points: Turn the focus ring towards the ‘Far’
side.