


Connecting the Antenna Cables
3-16
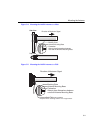
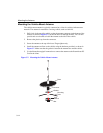
Connecting the Cables
Once the antenna is properly installed, you can connect the antenna to the RoamAbout AP
via the RoamAbout Lightning Protector.
1. Verify that the low-loss antenna cable is properly connected to the antenna cable.
2. Secure the low-loss cable to the mast such that the cable connectors do not support the
full weight of the cable.
3. Provide a drip-loop at the bottom of the low-loss cable just before it enters the building.
4. Connect the opposite end of the low-loss cable to the RoamAbout Lightning Protector.
5. Prior to securing the cable along its complete length, use the RoamAbout AP Manager
program to analyze wireless performance and optimal placement of the outdoor
antenna as described in the “Optimizing RoamAbout Outdoor Antenna
Placement” section on page 3-17. If required, adjust the direction of the antenna.
6. Once the installation has been fully tested, tighten antenna mounting nuts to lock the
antenna into its position.
7. Secure the cable along its complete length. No part of the cable should be allowed to
hang free.
8. Use waterproof stretch tape to seal all outdoor connectors.
CAUTION: To avoid damage to the antenna cable and connectors, do
not use tools to tighten cable connectors.
CAUTION: To prevent damage, avoid overtightening the connectors,
nuts, and screws used to mount the antenna.