


53
Configuring for a Windows
Network
If your computer is on a Windows 95 or Windows 98 network and you want other
users to share the printer connected to it, you need to:
■ Set up the system connected to the printer (host system) so the printer can be
shared
■ Define a path to the printer on each client computer
Before following the steps here, make sure you’ve installed the printer software on all
the computers that will use the printer. See the Start Here card for instructions.
If you’re using your printer on a Windows NT 4.0 network,
see your network administrator or your Windows NT
documentation for instructions on configuring your printer for
the network.
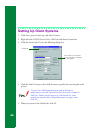
Setting Up the Host System
1. Click Start, point to Settings, and select Control Panel.
2. Double-click Network, then click the File and Print Sharing button.
3. Click the I want to be able to allow others to print to my printer(s) checkbox
and click OK.
4. In the Network window, click OK.
5. In the Control Panel, double-click Printers.
6. Right-click the EPSON Stylus Photo 1200 icon, then click Sharing.
7. Click the Shared As radio button. Then enter a Share Name, Comment, and
Password as necessary and click OK.