


PowerLite 1810p/1815p
18 - PowerLite 1810p/1815p 3/08
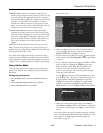
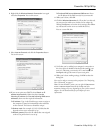
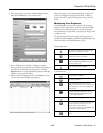
6. If you set up the projector to prompt you for a keyword
before connecting, you see a screen like this one:
Type in the four-digit number displayed on the EasyMP
Network screen and click
OK.
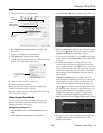
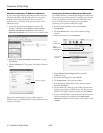
7. Once the connection is established, you see your computer’s
image transmitted to the screen and a floating control bar on
your computer desktop:
8. If necessary, you can drag the control bar out of the way on
your screen.
9. When you’re done with your presentation, click
Disconnect
on the control bar.
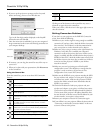
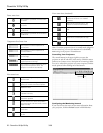
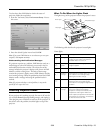
Using the Control Bar
From the control bar, you can access these NS Connection
features:
Clicking one of the buttons on the control bar may cause a
submenu to appear above the control bar.
When you’re done, click the arrow in the upper right corner to
close the submenu.
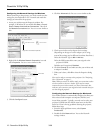
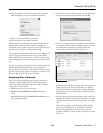
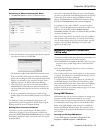
Solving Connection Problems
If you don’t see your projector on the EMP NS Connection
screen, then check the following:
❏ Make sure your wireless signal is strong enough to establish a
connection. If you have a Mac, check the AirPort icon on the
Mac menu bar. For Windows, see the documentation for
your access point or wireless network card or adapter.
❏ Make sure you’re trying to connect to the right network. In
Windows, verify that you’ve enabled your computer’s
connection to the access point or that your wireless card or
adapter is enabled, and that its SSID matches the projector’s
ESSID. In Mac OS X, check the AirPort status menu (click
the AirPort icon on your menu bar) to make sure AirPort is
turned on and the projector’s ESSID or your AirPort
network is selected.
❏ Make sure you aren’t projecting one of the EasyMP
configuration screens. (You should see a message that the
projector is ready to connect.) If you have to exit a
configuration screen, restart NS Connection.
❏ Make sure the ESSID for your projector matches the SSID
for your wireless card, adapter, or access point. If you have
an AirPort base station, make sure the projector’s ESSID
matches the AirPort network name. Remember that the
ESSID is case-sensitive.
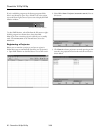
❏ Check the IP address for both your projector and your
wireless card, adapter, access point, or AirPort base station.
The first three octets of the IP address should be identical.
The last octet of the projector’s IP address should be close,
but not identical, to the last octet of the IP address for your
wireless interface, access point, or base station.
❏ Restart your computer and start NS Connection again.
❏ If you still don’t see your projector, follow the instructions in
“Connecting in Advanced Connection Mode” in the next
section to connect to the printer.
Displays the Select target projector dialog box.
Stops projection of computer images while connecting
to the projector.
The projector projects the computer image.
Pauses projection of computer images. Click again to
restart projection.
Starts Presentation Mode for the selected projector.
In Presentation Mode, only your slideshow images are
projected.
Displays the Projector Control screen, which allows you
to enable A/V Mute, switch the PC source, or switch
the video source.
Starts Movie Sending Mode for projecting MPEG2
videos from your computer (Movie Sending Mode does
not work with DVD movies).
Allows you to set up Multi-screen display and see a
preview of how the images will appear on each screen.
Displays the Projector Settings dialog box.
Enter keyword
Windows
Macintosh
Disconnects the connection to the projector.
Changes which buttons are displayed on the control
bar.