


Graphics
The print head
To understand dot graphics you should first learn how your
printer’s print head works.
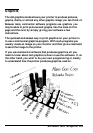
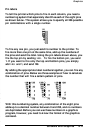
The print head has nine pins arranged in a vertical column. As the
print head moves across the page, electrical impulses cause the pins
to fire. Each time a pin fires, it strikes the inked ribbon and presses
it against the paper to produce a small dot. The pins fire time after
time in different patterns that produce letters, numbers, and
graphic symbols.
Dot patterns
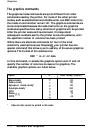
The print head is able to print both graphics and text because
graphic images are formed on the printer in the same way that
newspaper and magazine pictures are printed. If you look closely at
a newspaper photograph, you can see that it is made up of many
small dots. Your printer also forms its images with patterns of
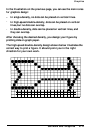
dots, as many as
240 dot positions per inch horizontally and 72
dots per inch vertically. The images printed by this printer can be
as finely detailed as the one at the beginning of this section.
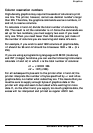
In its main graphics mode, your printer uses only the top eight of
the nine pins to print one column of dots for each code it receives.
Your graphics program, therefore, must send one code for each
column in a line. Each code specifies the dot pattern for that
column.
To print graphic images taller than eight dots, the print head must
make more than one pass. After printing one line, the printer
advances the paper and prints another, just as it does when
printing text.
To keep the print head from leaving gaps between graphics lines as
it does between text lines, the line spacing must be changed using
the ESC A command described in Chapter
9. Since an 8-dot
column prints lines that are 8/72-inch high, you generally want to
set the line spacing to 8/72nds, as you’ll see in a sample program
later in this chapter.
4-10
Software and Graphics