


Px Series Application Switch Installation and Configuration Guide 2-5
Powering On the SummitPx1
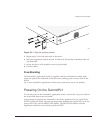
Figure 2-3: Fitting the mounting bracket
5 Repeat steps 2-4 for the other side of the device.
6 Insert the application switch into the 19-inch rack. Ensure that ventilation holes are
not obstructed.
7 Secure the device with suitable screws (not provided).
8 Connect cables.
Free-Standing
The SummitPx1 application switch is supplied with four self-adhesive rubber pads.
Apply the pads to the underside of the device by sticking a pad at each corner of the
device.
Up to four SummitPx1 application switches can be placed on top of one another.
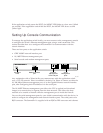
Powering On the SummitPx1
To turn on power to the SummitPx1 application switch, connect the AC power cable to
the switch and then to the wall outlet.
After turning on power to the SummitPx1, the device performs a Power On Self-Test
(POST). During the POST, all ports are temporarily disabled, the packet LED is off, the
power LED is on, and the MGMT LED flashes. The MGMT LED flashes until the
application switch has successfully passed the POST.
WS_011