


Installation and
Rear Panels
This section contains installation and cabling instructions for the PCS4. The following topics
are discussed:
• Installation Overview
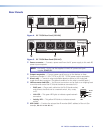
• Rear Panels
• Setting Up the LAN Port
• Connecting the Devices
Installation Overview
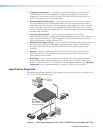
To install and set up an IPL T PCS4 interface, follow these steps:
1. Turn off all of the equipment. Make sure that the video sources (DSS, cable boxes, or
other devices), the IPL interface, the output devices (monitors, VCRs, projectors, and so
on), and the controller are all turned off and disconnected from the power source.
2. If desired, mount the PCS4 interface (see “Mounting the IPL T PCS4 Interface” in the
“Reference Material” section).
3. Plug the PCS4 power cord into an AC outlet. For the 120 VAC version, use the supplied
14 AWG IEC power cord (part number 27-407-01).
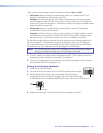
4. Connect an active LAN Ethernet cable to the RJ-45 port on the rear panel to establish a
link to the network.
5. Set up an IP address for the PCS4 (see “HTML Configuration and Control” or
“SIS Programming and Control”).
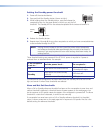
6. Plug the desired devices into the power receptacles on the PCS4 rear panel.
7. Press the front panel buttons to power on the receptacles.
8. Turn on the output devices.
9. Configure the PCS4 interface through the front panel, Telnet, or the web pages, then
access the unit using an Internet browser.
4IPL T PCS4 • Installation and Rear Panel