


Transparent mode installation Reconnecting to the web-based manager
FortiGate-800/800F Installation Guide 01-28006-0024-20041026 49
5 Select Set Time and set the FortiGate system date and time.
6 Set the hour, minute, second, month, day, and year as required.
7 Select Apply.
To use NTP to set the FortiGate date and time
1 Go to System > Config > Time.
2 Select Synchronize with NTP Server to configure the FortiGate unit to use NTP to
automatically set the system time and date.
3 Enter the IP address or domain name of the NTP server that the FortiGate unit can
use to set its time and date.
4 Specify how often the FortiGate unit should synchronize its time with the NTP server.
5 Select Apply.
To register your FortiGate unit
After purchasing and installing a new FortiGate unit, you can register the unit by going
to the System Update Support page, or using a web browser to connect to
http://support.fortinet.com and selecting Product Registration.
To register, enter your contact information and the serial numbers of the FortiGate
units that you or your organization have purchased. You can register multiple
FortiGate units in a single session without re-entering your contact information.
To configure virus, attack, and spam definition updates
You can configure the FortiGate unit to automatically keep virus, grayware, and attack
definitions up to date.
1 Go to System > Maintenance > Update Center.
2 Select Refresh to test the FortiGate unit connectivity with the FortiProtect Distribution
Network (FDN).
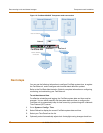
To be able to connect to the FDN the FortiGate unit default route must point to a
network such as the Internet to which a connection to the FDN can be established.
If FortiProtect Distribution Network changes to Available, then the FortiGate unit can
connect to the FDN.
3 Select Scheduled Update and configure a schedule for receiving antivirus and attack
definition updates.
4 Select Apply.
5 You can also select Update Now to receive the latest virus and attack definition
updates.