45
User-Installable Features
Memory Upgrade
Module
Your LifeBook notebook has two memory slots, and the
system comes with 256 MB, 512 MB, or 1 GB of factory-
installed memory. If you have a module installed in only
one slot, you can increase your LifeBook notebook’s
memory capacity by installing another memory upgrade
module in the empty slot or by increasing the size of the
single installed module. The minimum amount of
memory in your system is 256 MB; the maximum
amount is 2 GB (two 1 GB modules). (Note: Systems
with Media Center Edition installed require a minimum
of 512 MB of memory installed).
Your notebook supports dual-channel memory. Dual-
channel memory can have a significant effect upon your
system’s performance. In order to support dual-channel
memory, two DIMM modules must be installed in your
computer.
Memory upgrades must be PC2-5300 DDR2-667 SO-
DIMM modules. To ensure 100% compatibility, we
recommend that you only purchase additional memory
from the Fujitsu on-line accessory store at:
us.fujitsu.com/computers
.
INSTALLING A MEMORY MODULE
1. Turn off power to your LifeBook notebook using the
power/suspend/resume button, and remove any
power adapter.
2. Make sure that all the connector covers are closed.
3. Turn the LifeBook notebook bottom side up, with
the front panel toward you.
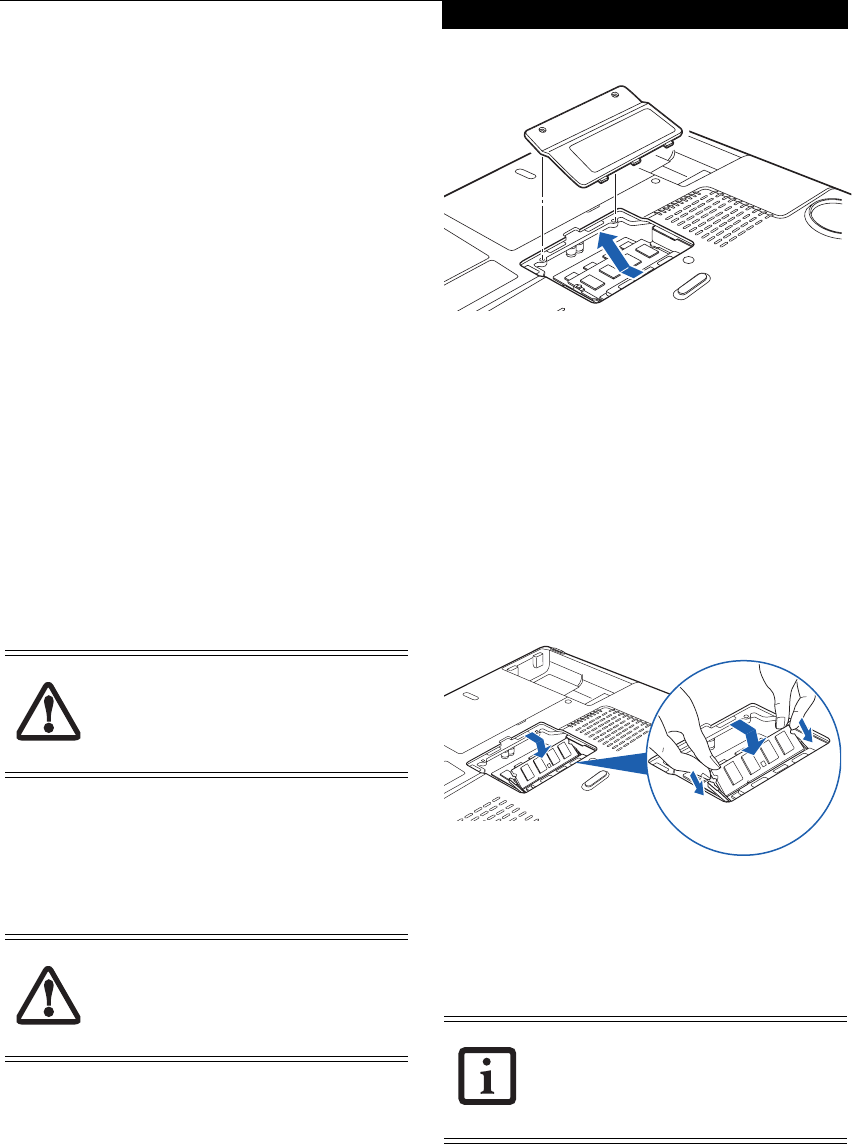
4. Remove the screws at the front of the memory
upgrade module compartment. (Figure 4-11)
5. Remove the cover by tilting the front edge up and
then pulling forward until the tabs on the cover are
free.
Figure 4-11. Opening the Memory Upgrade Compartment
6. Remove the memory upgrade module from the
static guarded sleeve.
7. Align the memory upgrade module with the part
side up. Align the connector edge of the memory
upgrade module with the connector slot in the
compartment. The connector will be pointing
toward the rear of the LifeBook notebook.
8. Insert the memory upgrade module at a 45° angle.
Press the connector edge of the module firmly down
and into the connector until it lodges under the
retaining clip. You will hear a click when it is prop-
erly in place. (Figure 4-12)
Figure 4-12. Installing a Memory Upgrade Module
9. Replace the cover by hooking the tabs under the rear
edge of the compartment opening and tilting down
until flush with the bottom of your notebook.
10. Replace the screws.
REMOVING A MEMORY UPGRADE MODULE
1. Perform steps 1 through 5 of Installing a Memory
Upgrade Module.
2. Pull the clips sideways away from each side of the
memory upgrade module at the same time.
Do not remove any screws from the
memory upgrade module compartment,
except the ones specifically shown in the
directions for installing and removing the
memory upgrade module.
The memory upgrade module can be
severely damaged by electrostatic
discharge (ESD). Be sure you are properly
grounded when handling and installing the
module.
The memory upgrade module is not
something you should routinely remove
from your notebook. Once it is installed,
you should leave it in place unless you
want to increase system memory capacity.
N6410-01.book Page 45 Tuesday, January 31, 2006 9:24 AM


