Page 5 - 5
OperationsOrca 80-99 Operation and Maintenance Manual
© GBC Films Group June 2000
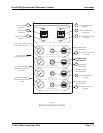
H. PULL ROLLER PRESSURE CONTROLS -
Regulation for the upper pull roll pressure and up/down.
I. BOTTOM BRAKE CONTROL - Regulation for
the bottom rear unwind brake.
J. BOTTOM CLUTCH CONTROL - Regulation for
the bottom rear rewind shaft’s clutch.
Setup
Set up of the Orca laminator is quick and
straightforward when instructions are followed directly.
When you first receive the Orca Laminator the nips
must be set before operation. The procedures for
setting the main and pull roll nips are on pages 8-1 and
8-2.
Laminator Roll Pressure:
1. You should use only the minimum amount of roll
pressure needed to accomplish the task. While higher
nip pressure can make the adhesive bond faster, excess
pressure can damage the rollers. Wrinkles, bubbles and
such have causes that generally cannot be cured with
more pressure.
2. A typical roll pressure for soft substrates such as
Foamcore or Orca-Board is between 20 to 30 pounds
per square inch (PSI) or 32 to 205 kPa.
3. The range of typical values for hard substrates is 25
to 50 PSI, 170 to 345 kPa.
Loading the Film
Film is loaded on the appropriate unwinds. Instructions
later in this section will cover loading and aligning film.
For applications such as encapsulation, film will be fed
from both top and bottom unwinds.
The process of loading and aligning film is the same for
both the top and the bottom. There are two important
points to remember when loadingfilm:
CAUTION:
Assure that film is always mounted so that the
adhesive side will face outward from the
laminating roller.
1. The adhesive side of the film must be oriented away
(on the outside) of the laminating roller. Otherwise it will
immediately bond to the roller, creating a major clean-
up project. Films have a shiny side and a dull side. The
dull side is the one with the adhesive. Thus, the dull side
should ALWAYS face outward from the laminating roll.
2. The film must be centered on the unwind for best
performance. This is vital when two films are fed
together. If the two films are not aligned, feed problems,
wrinkles, excess glue on rolls and other assorted
troubles will result.
CAUTION:
Unless the two films fed to the nip are carefully
aligned, poor results will be seen.
Positioning Film
The following procedure is applicable to both the top
and the bottom feed unwinds:
1. Remove the ball detent retaining pins and carefully
remove the unwind/rewind shaft from its saddles. Pay
particular attention to the drive side saddles. The drive
side of the shafts must be oriented so as to not pry on
the brake or clutch protrusion. To do so would
irreparably damage both brakes and clutches.
2. Slide the film onto the unwind shaft.
3. Install the shaft back into its saddles again paying
careful attention to the drive side end of the shaft.
Return ball detent pins to secure the shaft in its saddles.


