


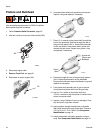
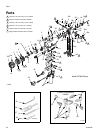


Repair
313872N 35
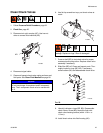
14. Install bulkhead onto piston shaft. Torque to
100-110 in-lb (11.3-12.4 N•m). See Component
Identification on page 16.
15. Apply medium strength threadlocker to threads then
install rear piston onto piston shaft. Torque to
100-110 in-lb (11.3-12.4 N•m). See Component
Identification on page 16.
16. Install piston safety lock. See Component Identifi-
cation on page 16.
17. Attach Front End, see page 33.
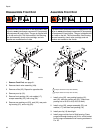
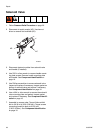
18. Use hex nut driver to install fluid manifold (AD).
Torque fluid manifold bolt to 20-30 in-lb
(2.26-3.39 N•m). Connect air quick coupler (AC).
19. Connect signal cable.
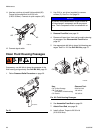
Purge Rod
1. Flush Gun, page 25.
2. Follow Pressure Relief Procedure, page 22.
3. Disconnect air quick coupler (AC). Use hex nut
driver to remove fluid manifold (AD).
4. Disconnect signal cable.
5. Remove Front End, see page 31. Inspect purge
rod for wear or damage. Replace if necessary.
6. Use 3/4 in. wrench to loosen front tip. Coat purge
rod with TSL then replace purge rod.
7. Attach Front End, see page 33.
8. Attach air quick coupler to fully extend purge rod.
Tighten front tip to 60-70 in-lb (6.78-7.91 N•m)
9. Install fluid manifold. Torque fluid manifold bolt to
20-30 in-lb (2.26-3.39 N•m).
10. Connect signal cable.
ti19571a
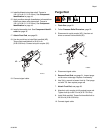
AD
AC
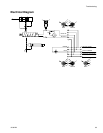
ti19568a
AC
AD