


The system will automatically operate in single channel mode, dual channel mode, or flex mode,
depending on how the SODIMMs are installed.
●
The system will operate in single channel mode if the SODIMM sockets are populated in one
channel only.
● The system will operate in a higher-performing dual channel mode if the total memory capacity
of the SODIMMs in Channel A is equal to the total memory capacity of the SODIMMs in Channel
B. The technology and device width can vary between the channels. For example, if Channel A
is populated with two 1 GB SODIMMs and Channel B is populated with one 2 GB SODIMM, the
system will operate in dual channel mode.
●
The system will operate in flex mode if the total memory capacity of the SODIMMs in Channel A
is not equal to the total memory capacity of the SODIMMs in Channel B. In flex mode, the
channel populated with the least amount of memory describes the total amount of memory
assigned to dual channel and the remainder is assigned to single channel. For optimal speed,
the channels should be balanced so that the largest amount of memory is spread between the
two channels. If one channel will have more memory than the other, the larger amount should be
assigned to Channel A. For example, if you are populating the sockets with one 2 GB SODIMM,
and three 1 GB SODIMMs, Channel A should be populated with the 2 GB SODIMM and one 1
GB SODIMM, and Channel B should be populated with the other two 1 GB SODIMMs. With this
configuration, 4 GB will run as dual channel and 1 GB will run as single channel.
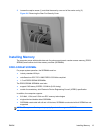
Installing SODIMMS
When facing the rear of the computer, there are four memory sockets located behind the large access
panel on the right. You must remove this panel to remove or install memory.
CAUTION: Static electricity can damage the electronic components of the computer. Before
beginning these procedures, ensure that you are discharged of static electricity by briefly touching a
grounded metal object. For more information, refer to
Electrostatic Discharge on page 36.
When handling a memory module, be careful not to touch any of the contacts. Doing so may damage
the module.
To remove or install memory modules:
1. Remove all removable media, such as compact discs or USB flash drives, from the computer.
2. Turn off the computer properly through the operating system, then turn off any external devices.
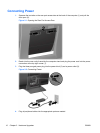
3. Disconnect the power cord from the power outlet and disconnect any external devices.
CAUTION: You must disconnect the power cord and wait approximately 30 seconds for the
power to drain before adding or removing memory modules. Regardless of the power-on state,
voltage is always supplied to the memory modules as long as the computer is plugged into an
active AC outlet. Adding or removing memory modules while voltage is present may cause
irreparable damage to the memory modules or system board.
4. If a security lock is installed on the rear of the computer, remove the lock.
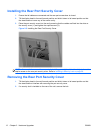
5. If the rear port security cover is installed, remove the cover.
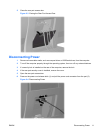
6. Open the rear port access door.
7. Disconnect all cables from the rear ports.
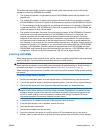
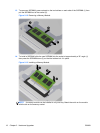
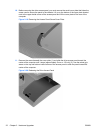
8. Place the computer face down on a soft flat surface. HP recommends that you set down a
blanket, towel, or other soft cloth to protect the screen surface from scratches or other damage.
ENWW Installing Memory 15