


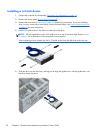


Installing a 3.5-inch or 2.5-inch hard drive
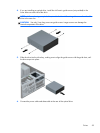
1. Prepare the computer for disassembly (Preparation for disassembly on page 37)
2. Remove the access panel (Access panel on page 38)
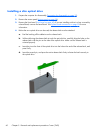
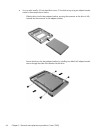
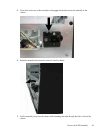
3. Install guide screws on the sides of the drive. 3.5-inch hard drives use standard 6-32 silver and
blue isolation mounting screws. 2.5-inch hard drives use metric M3 black and blue isolation
mounting screws.
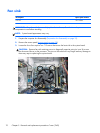
NOTE: Four extra 6-32 isolation mounting guide screws for 3.5-inch hard drives are installed on
the exterior of the hard drive bays. Extra guide screws for 2.5-inch hard drives are not provided
on the chassis but can be purchased from HP. Refer to
Drives on page 51 for an illustration of the
extra 6-32 isolation mounting guide screws location.
If you are replacing a drive, transfer the guides screws from the old drive to the new one.
If you are installing a 3.5-inch hard drive, install four silver and blue 6-32 isolation mounting
guide screws (two on each side of the drive).
If you are installing a 2.5-inch hard drive, install four black and blue M3 isolation mounting
guide screws (two on each side of the drive).
Drives
63