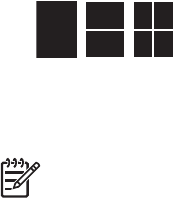
3. Use the 4–way arrow button to select a layout:
– Print one photo per sheet
– Print two photos per sheet
– Print four photos per sheet
4. Press OK.
The printer may rotate your photos to fit the layout.
Note Borderless printing is the default. If you want a narrow white border around
a photo, you can turn the borderless setting off. To turn off borderless printing,
see Printer menu.
Print your photos
This section explains how to print digital photos that are stored on a memory card. You
can select photos while the memory card is in the camera (Digital Print Order Format, or
DPOF) or while the memory card is in the printer. Printing from a memory card requires
no computer and does not drain your digital camera's batteries. See Get photos from a
memory card.
Your photos are instantly dry, and can be handled immediately after they are printed.
However, HP recommends that you leave the printed surface of your photos exposed to
the air for 5-10 minutes, to allow the colors to fully develop before you stack them with
other photos or place them in albums.
To print a single photo
1. Navigate through the photos on the inserted memory card.
2. Display the photo you want to print.
3. Press Print.
After you press Print, the estimated time until print completion appears, and will
count down during printing.
To print a group of selected photos
1. Navigate through the photos on the inserted memory card.
2. Select the photos you want to print. See Select multiple photos.
3. Press Print.
After you press Print, the estimated time until print completion appears, and will
count down during printing.
To print a photo index
1. Press Menu.
2. Select Print Options, and then press OK.
3. Select Print Index Page, and then press OK.
A photo index shows thumbnail views and index numbers for up to 2000 photos on a
memory card. You can use the index numbers to print specific photos or a range of
photos. Use an index card instead of photo paper to cut costs when printing index pages.
HP Photosmart A610 series User Guide 19


