


CHAPTER 5 TCP/IP PRINTING
5-7
Windows
®
NT
®
4.0 Printing
(Printer Driver already installed)
Follow these steps if the printer driver is already installed.
1. Click on Start then select Settings/Printers to display the currently
installed printer drivers.
2. Double click the printer driver you wish to configure and select Printer
menu and then choose Properties.
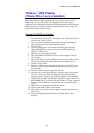
3. Select the Ports tab and click on Add Port.
4. Select LPR Port (LPR Port will not be displayed unless you install the
"Microsoft TCP/IP Printing" protocol as described earlier) from the list
of available ports and click on New Port.
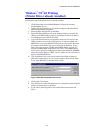
5. Type in the IP address that you assigned to the Print / Fax server in the
Name or address of server providing lpd: box. If you have edited your
HOSTS file or are using Domain Name System, you can enter the name
associated with the Print / Fax server, instead of an IP address. As the
Print / Fax server supports TCP/IP and NetBIOS names, you can also
enter the NetBIOS name of the Print / Fax server. The NetBIOS name
can be seen in your print configuration sheet. From default the NetBIOS
name will usually appear as "BRN_xxxxxx" where xxxxxx is the last six
digits of the Ethernet address.
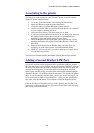
6. Type in the Print / Fax server service name in the Name of printer or
print queue on that server: box. If you do not know which service name
to use, enter BINARY_P1 and then click on OK:
Figure 1 Add LPR compatible printer screen
7. Click on the Close button.
8. You should now see that the printer driver is configured to print to the IP
address (or name) that you specified.
9. If you wish to share the printer, click on the Share tab and share the
driver.