


Combined Boot User Manual Page 13
4. Select 1 to enable the spinup delay, or press 2 to disable it.
5. Press <x> to exit the BIOS utility and reboot the system.
Set Auto Scan
This option allows you to set auto scan. The factory default setting is disabled. Auto Scan is available
only if none of the eight boot entries is configured to boot via DID or WWPN. It is strongly recommended
that you use the Configure Boot Devices menu to configure eight boot entries for fabric point-to-point,
public loop or private loop configurations.
With auto scan enabled, the first device will issue a Name Server Inquiry. The boot device will be either
the first DID, LUN 0, or not LUN 0 device returned, depending on the option you select. Only this device
will be the boot device and it will be the only device exported to the Multi-boot menu.
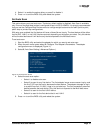
To set auto scan:
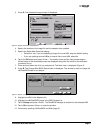
1. Start the BIOS utility and select the adapter for which you want to set auto scan.
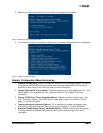
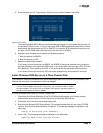
2. When the main menu opens select 2, Configure This Adapter's Parameters. The adapter
configuration menu is displayed (Figure 11).
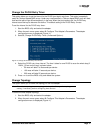
3. Select 6, Auto Scan Setting (+Advanced Option+).
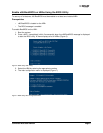
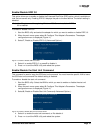
Figure 16: Set Auto Scan Screen
4. Select the auto scan option:
• Select 1 to disable auto scan.
• Select 2 to scan for any first device. The first adapter issues a name server inquiry, and
the first D_ID from the inquiry becomes the boot device. The adapter attempts to log in
to a public loop first. If it fails, it logs in to a private loop. The first successfully scanned
device becomes the boot device. Only this device is exported to the Multi-boot menu.
• Select 3 to scan for the first LUN 0 device.
• Select 4 to scan for the first device that is not LUN 0.
5. Press <x> to exit the BIOS utility and reboot the system.