


3ware Escalade ATA RAID Controller Installation Guide
20
www.3ware.com
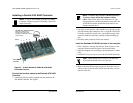
Escalade ATA RAID Controller is keyed to ensure proper instal-
lation into a full-sized PCI slot.
6 Ensure that the contacts will mate with both grooves in the slot.
Press down gently on the edge of the ATA RAID Controller
directly above the slot until it is fully seated.
7 Check that the ATA RAID Controller’s metal bracket covers the
hole in the case and secure the bracket with the screw that was
used to secure the filler bracket in step 4.
Connect the drives to the interface cables
Using native serial ATA drives
1 If your drives are not already installed in the computer chassis,
install them now. Be sure that the drives are connected to the
power supply.
2 For each drive, select the end of an interface cable not connected
to the ATA RAID Controller and plug it into the drive or drive
carrier. One edge of each interface cable connector is keyed to
ensure proper installation.
Using parallel ATA-133 or ATA-100 drives with converter kit
(CBL-P-SATA)
Note:
UltraATA-66 and UltraATA-33 drives are not
supported.
1 Before connecting your drives, check each drive’s jumper set-
ting. The range of settings vary by manufacturer as do the
method for adjusting them. Refer to information provided with
your drives for the method required to set them. To operate prop-
erly, the Escalade ATA RAID Controller requires that drives be
set as Single (if available on your drive) or Master.
Hardware Installation
www.3ware.com
21
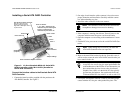
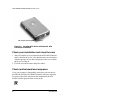
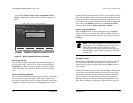
2 Install two jumpers on the converter if not already installed. See
Figure 3 for location to set jumper settings.
3 Connect a Power Converter Adapter to each converter. See
Figure 3 for connector locations.
4 When you have completed steps 2 and 3 for each converter,
install a Converter onto the back of each parallel ATA drive.
Make sure that each converter is properly aligned and securely
pushed in. The converter board’s power connector must be adja-
cent to the drive’s power connector. See Figure 3.
Note:
The Serial ATA Converter has sharp points.
Please use caution when pushing the converter onto the
back of the drive.
5 Connect the Power Adapter to the power receptacle on the drive.
6 If your drives are not already installed in the computer chassis,
install them now. Be sure that the drives are connected to the
power supply.
7 Connect each power adapter to the power supply.
8 For each drive, select the end of an interface cable not connected
to the ATA RAID Controller and plug it into the Converter.