


3ware Escalade ATA RAID Controller Installation Guide
44
www.3ware.com
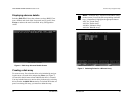
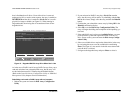
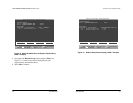
10 Press F8 to rebuild. The rebuild confirmation screen will be dis-
played (see Figure 18).
Figure 18. Rebuild Confirmation Display
11 Enter Y to update configurations and exit.
Auto rebuild of a mirrored or RAID 5 array
If a hot spare is specified and the mirrored or RAID 5 array
degrades, an event notification is generated and the hot spare
dynamically replaces the failed drive in the array without user inter-
vention. Rebuild will automatically be launched as a background
process and an event notification will notify the user when the
rebuild process is complete.
Restore Initial Values
Cancel
Done
F6
F8
Esc
3ware Disk Array Configuration
Creating or destroying arrays will destroy all existing data
on their member disk drives. Using a drive for a rebuild will
overwrite data on that drive.
Data on the following drives will be destroyed.
Port 3 - QUANTUM FIREBALLP LM30
Update configuration and exit? [Y/N]
3ware Disk Array Configuration Utility
www.3ware.com
45
Auto rebuild on power failure
During driver startup 3ware’s auto rebuild feature sets a flag indi-
cating that the driver loaded. Upon an orderly shutdown the flag is
rewritten, indicating a clean shutdown. During the next system
power cycle the firmware queries the flag. For a RAID 1 or 10 con-
figuration, if there was a problem, the firmware degrades the sec-
ondary drive in the array and starts the background rebuild of the
mirrored drive. When the rebuild is complete the two halves of the
mirror are redundant again. For a RAID 5 configuration, if there is a
problem, the firmware starts the background verification that
checks that the parity matches the data.
Cancelling and restarting a rebuild with a new drive
Currently, a rebuild cannot be cancelled using the 3DM software,
but a rebuild can be aborted by physically removing the disk used to
replace the degraded drive. Abort a rebuild by following the appli-
cable procedure below.
If your system has hot swap carriers:
1 Remove the disk while the system is powered. The rebuild will
be immediately aborted.
2 Go to the Configure screen and click the box in front of the disk
drive that was removed. Click on Remove Drive.
3 Add another drive and click on the box in front of this port.
Click on Add Drive. The drive is called “RAID Disk”.
4 Click the boxes in front of the RAID Disk and the degraded
array. Select Rebuild. The rebuild starts with the new disk drive.
If your system does not have hot swap carriers:
1 Power down the system and remove the disk drive that caused
the array to become degraded.
2 Add a different disk drive to rebuild the array.
3 Press Alt + F3 at Boot time to enter 3ware BIOS.
4 Select the degraded array and the newly added drive.
5 Select Rebuild.