HelvC
NugFont
C39
Getting Started
1-7
1
Loading Media for Fanfold Printing
Use the sample of fanfold media provided in the Media Envelope to complete the
following procedures. In fanfold printing, you place a stack of fanfold media at the rear
of the printer and feed it into the printer through a slot in the rear cover. Refer to
Chapter 2, “Operating the Printer,” for instructions on loading rolls of media.
To load media for fanfold printing
1. Open the printer.
2. Disengage the printhead by rotating the head lift lever clockwise until it releases.
3. Move the supply roll retainer by turning it counterclockwise and sliding it to the
outer end of the supply post.
4. Place the fanfold media slightly lower than the slot in the printer back cover. Line
the (box of) fanfold media up with the label path through the printer. Insert media
through the slot at the rear of the printer and thread it over the supply roll post.
5. To allow easy access to the media path, pull down on the lower media guide. Make
sure that the edge guide is slid all the way to the outer edge of the edge guide plate.
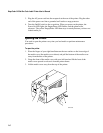
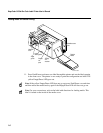
6. Insert the fanfold media through the printer mechanism as shown in the illustration
on the next page. The front edge of the media should pass over the tear bar and
through the label dispense opening in the media cover. The fanfold media should
pass over the supply roll post.
7. Release the lower media guide and adjust the edge guide to position the media
firmly against the inside wall of the printer.
8. Slide the supply roll retainer up to the edge of the fanfold media and turn the supply
roll retainer clockwise until it locks firmly in place securing the media against the
inside wall of the printer.
9. Engage the printhead by rotating the head lift lever counterclockwise until it locks.
10. Close the printer by reversing the directions for removing the cover.


