


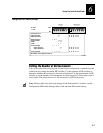
HelvC
NugFont
C39
Using Test and Service Mode
6-5
6
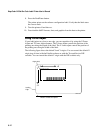
Printing Test Labels
The printer can print a variety of test print labels that provide you with information
about the printer configuration and the quality of the printing.
To print a test label
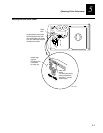
1. Turn the On/Off switch to the off position.
2. Press and hold the Feed/Pause button while turning on the printer.
The printer prints a hardware configuration label and then enters Data Line Print
mode.
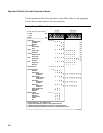
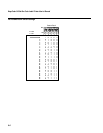
3. Set the DIP switches to print the test label of your choice: software, print quality, or
pitch. Refer to the Test and Service DIP Switch Settings table for the correct
settings.
4. Hold the Feed/Pause button down until the printer starts printing.
The printer begins printing out the test label immediately.
5. Exit Test and Service mode by turning the printer off and returning all DIP
switches to their original settings.
Using Data Line Print
Use Data Line Print mode to troubleshoot communication between the printer and the
host and to test the operation of the printer. When the printer is in Data Line Print
mode, it prints out all downloaded data with the hexadecimal equivalent directly
underneath it. Hold the Feed/Pause button down to momentarily suspend the test. Press
the Feed/Pause button longer to transmit the firmware program and version number to
the host.
To enter Data Line Print mode
1. Turn the On/Off switch to the off position.
2. Press down and hold the Feed/Pause button while turning on the printer.
The hardware configuration test label prints out. You are now in Data Line Print mode.